PopPop AI Support Center
Welcome to the PopPop AI Help Center, where you’ll find detailed guides for using our services and step-by-step solutions to common issues.
TTSFree AI User Guide
This guide covers everything you need to know about using TTSFree AI, including managing projects, batch processing files, designing custom voices, requesting voice cloning, and understanding how the app processes your text. We recommend reading through the sections in order to build a solid foundation before diving into specific workflows, and feel free to revisit any part whenever you need a quick refresher.
Introduction to TTSFree AI
TTSFree AI is organized into seven main sections accessible from the sidebar. Understanding these modules will help you navigate the tool efficiently.
Project
The Project panel is your primary workspace for managing all assets related to a specific project. It functions as a dedicated folder where you can convert text, preview audio, and make edits in one place. Projects support two modes: Standard Mode for straightforward text-to-speech conversion, and Script Mode for dialogue-heavy content that requires multi-voice orchestration and precise control.
Tasks
The Tasks module is designed for high-volume processing. Use this section when you need to batch convert multiple files into audio in bulk.
Library
The Library is your central hub for discovering and organizing voices. It is divided into four categories:
• Project Voices: System or custom voices manually added to your current project.
• Voice Design: Original voices you have created using the Voice Design tool.
• System: The full catalog of built-in voices provided by TTSFree AI.
• Frequently Used: A dynamic list of voices you use most often, automatically updated based on your usage patterns.
Design
The Voice Design feature allows you to create unique AI voices tailored to your needs. You can generate an entirely new voice from scratch by describing its characteristics in a text prompt, or select an existing system voice as a base and refine it further through prompt-based adjustments.
Cloning
Voice Cloning enables you to replicate a specific person’s voice for personalized TTS output. This feature is not yet publicly available. The Cloning page currently serves as a request portal where you can submit a cloning application.
Model Manager
The Model Manager is where you select, download, and manage the TTS large language models that power your audio generation.
Settings
The Settings section provides access to standard system preferences and configuration options.
Now let’s delve into the details of how to use TTSFree AI.
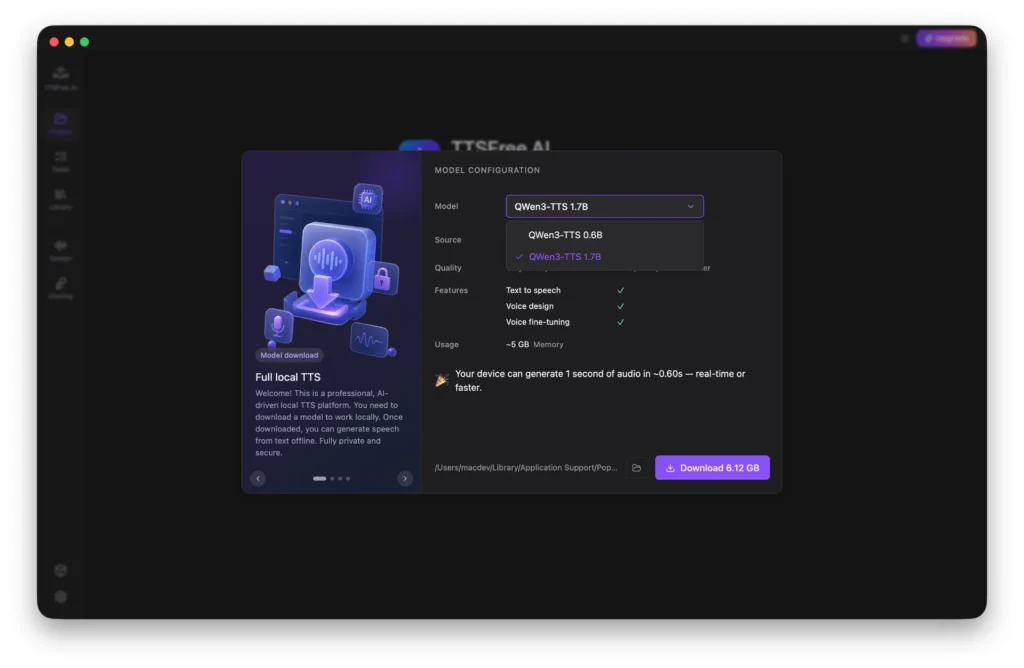
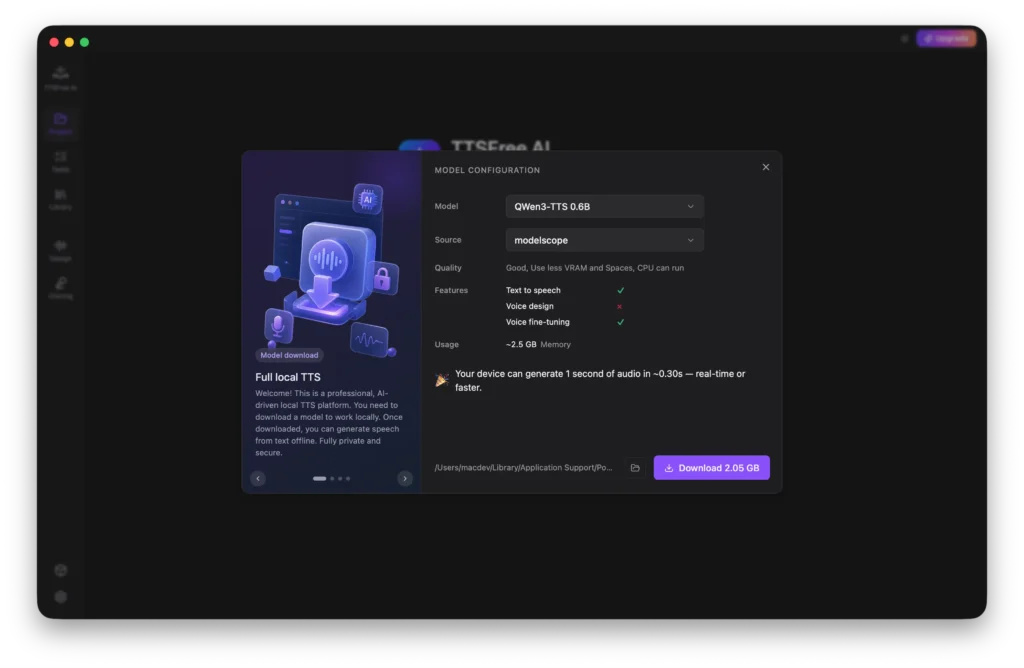
Getting Started: Model Configuration
If you have newly installed the app, you will see the Model Configuration pop-up after launching it. You must select and download a TTS model that best suits your needs before proceeding. We offer two options: QWen3-TTS 1.7B (high-quality pro) and QWen3-TTS 0.6B (lightweight & efficient). Both models share the same core benefits listed below, but vary in audio quality, generation speed, and resource usage.
• Deep semantic understanding
• Intelligent emotion and prosody control
• Seamless multilingual mixing
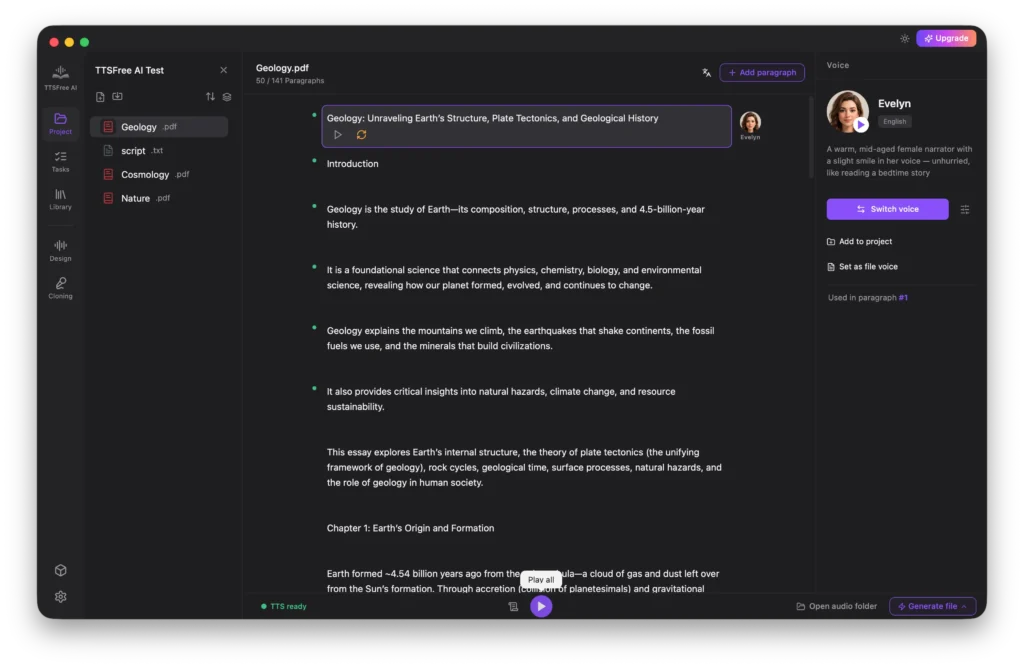
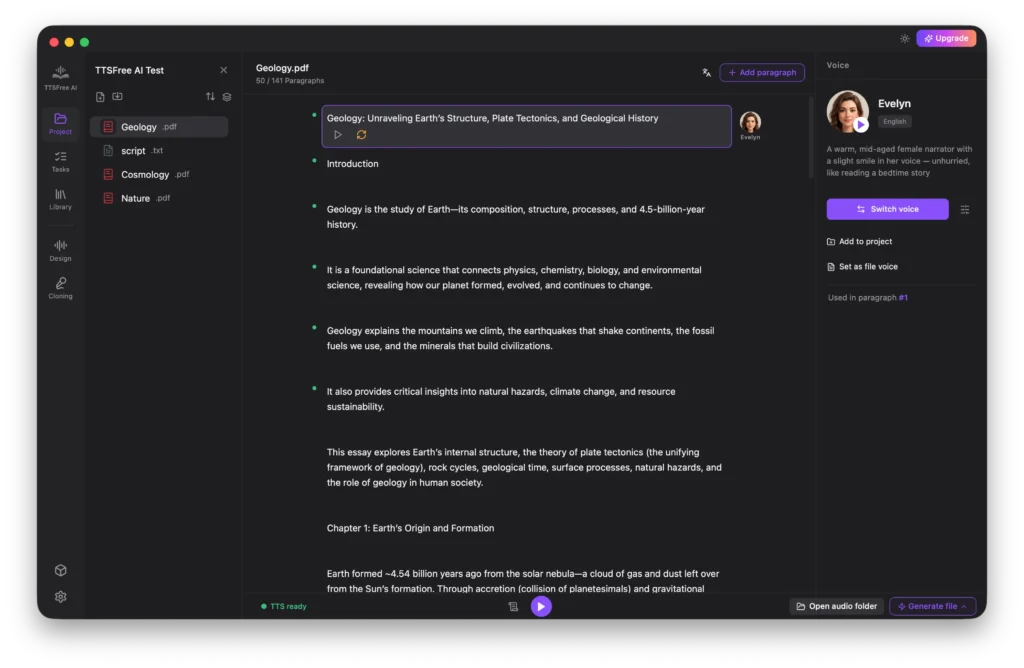
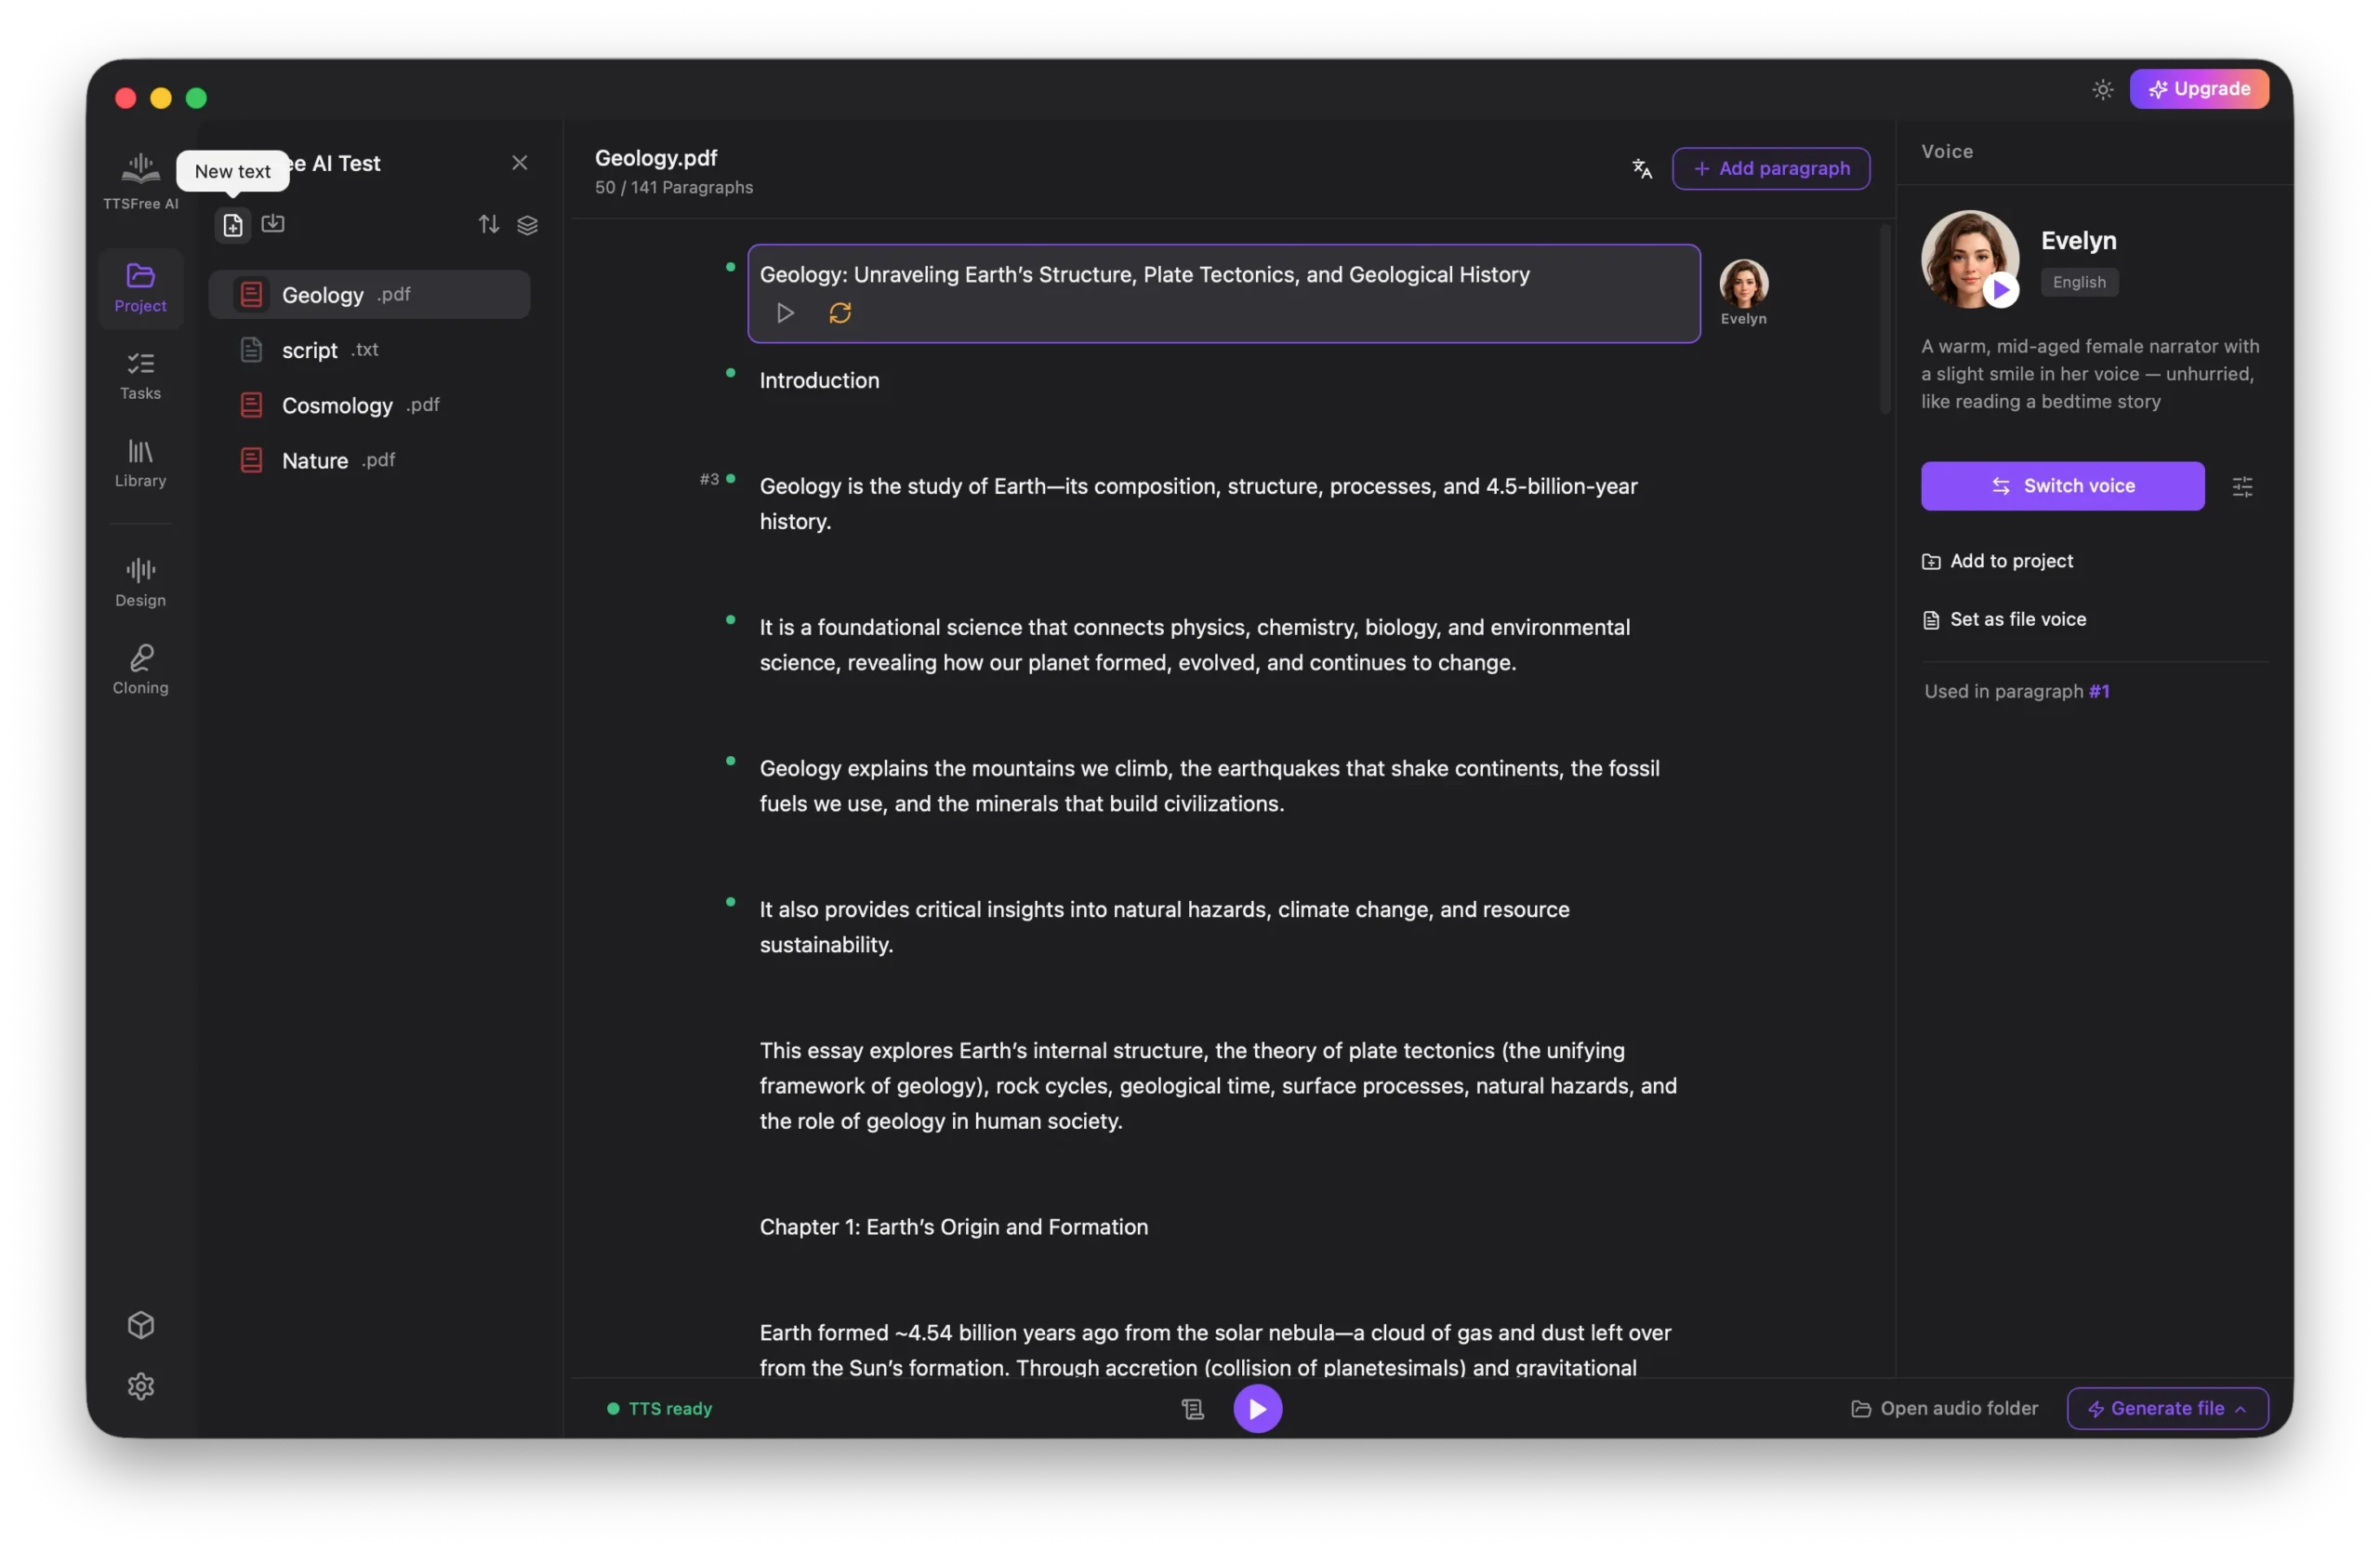
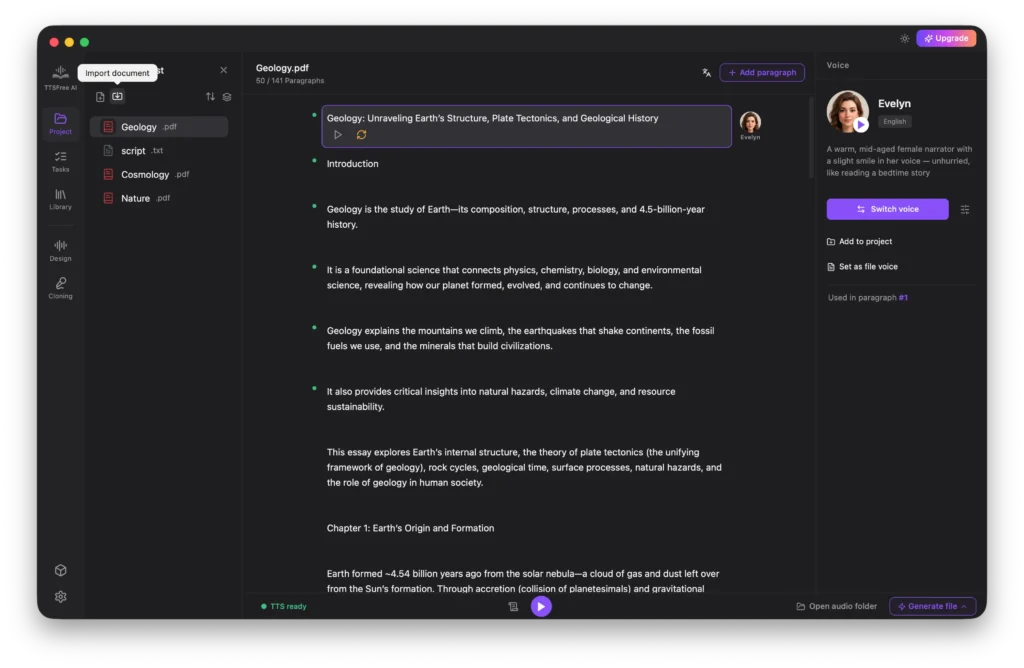
Project: How to Convert Your Document to Speech
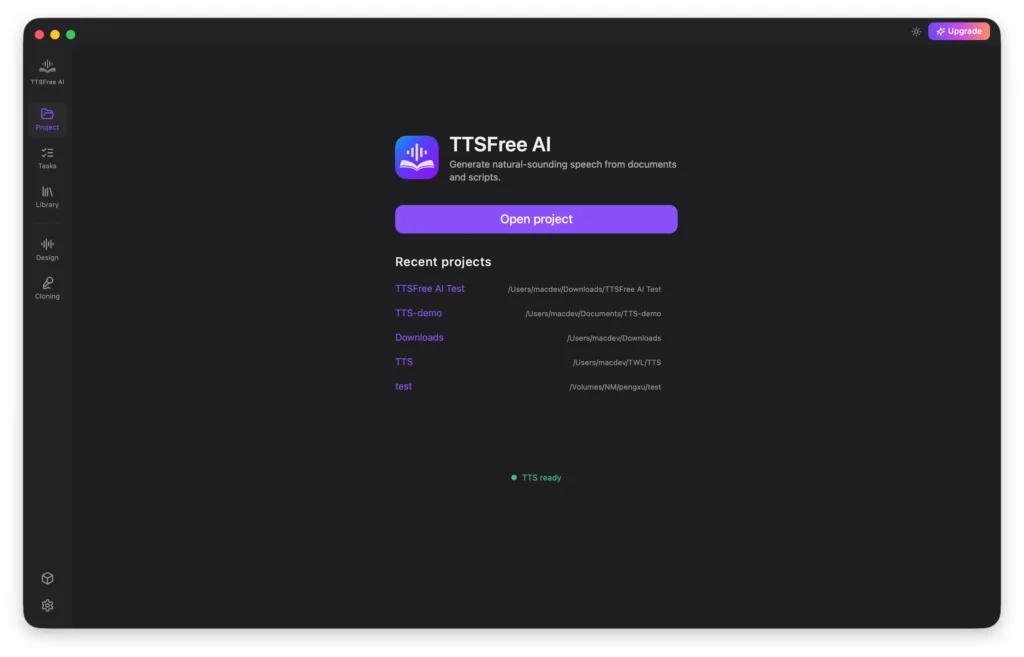
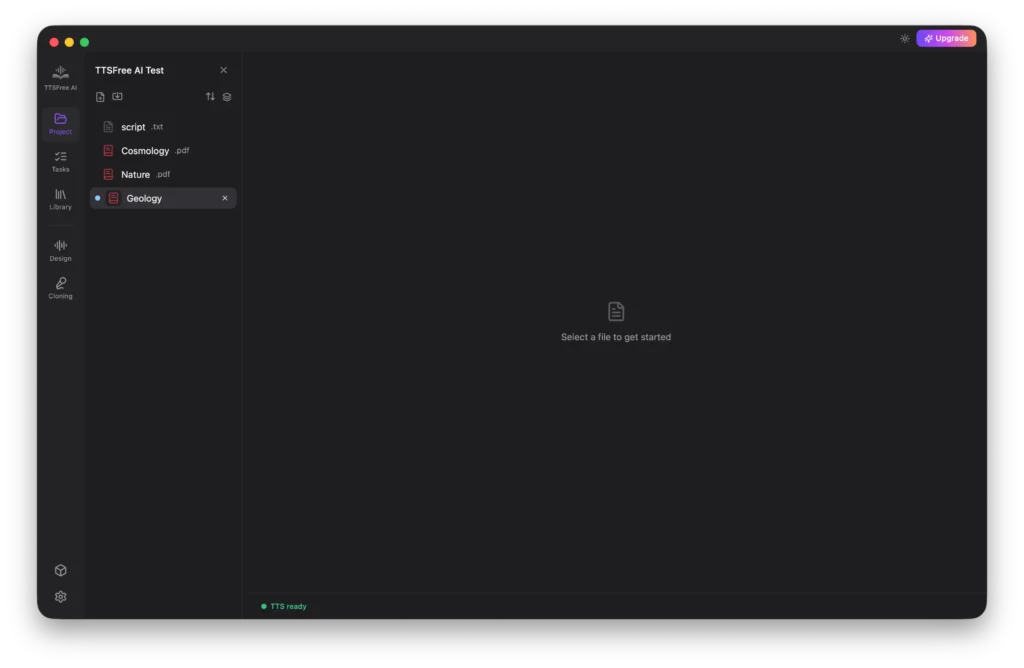
Whenever you launch TTSFree AI, you will need to open a project by either creating a new one or selecting one from the Recent Projects list. Simply choose the folder containing the files you want to convert. Any new documents added to this folder later will be automatically fetched by the app. Once your project is open, select a file to begin the conversion process.
Working with Common Documents
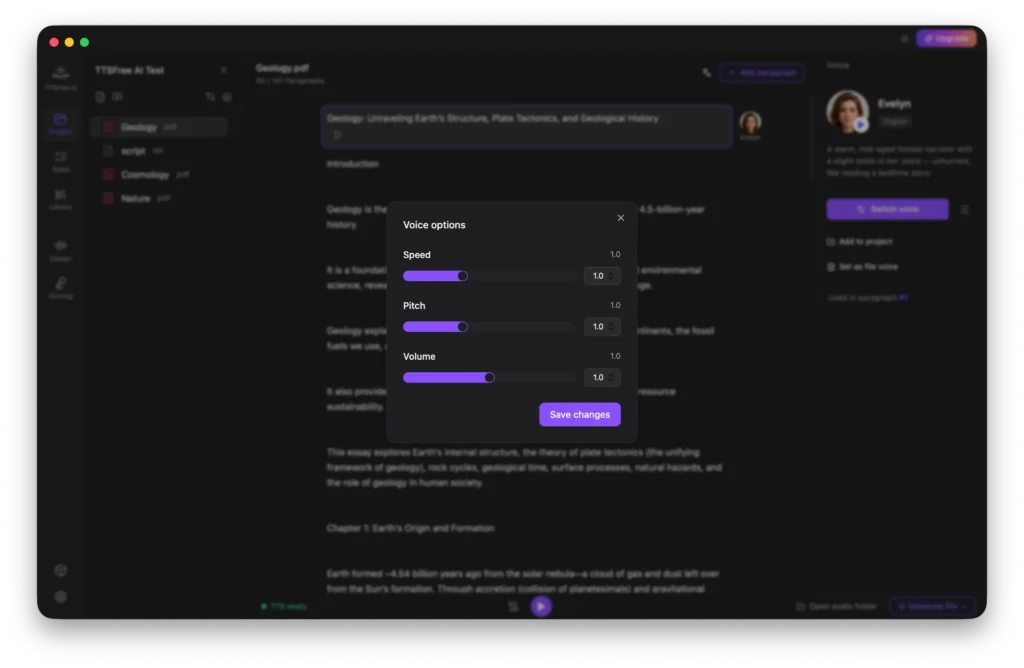
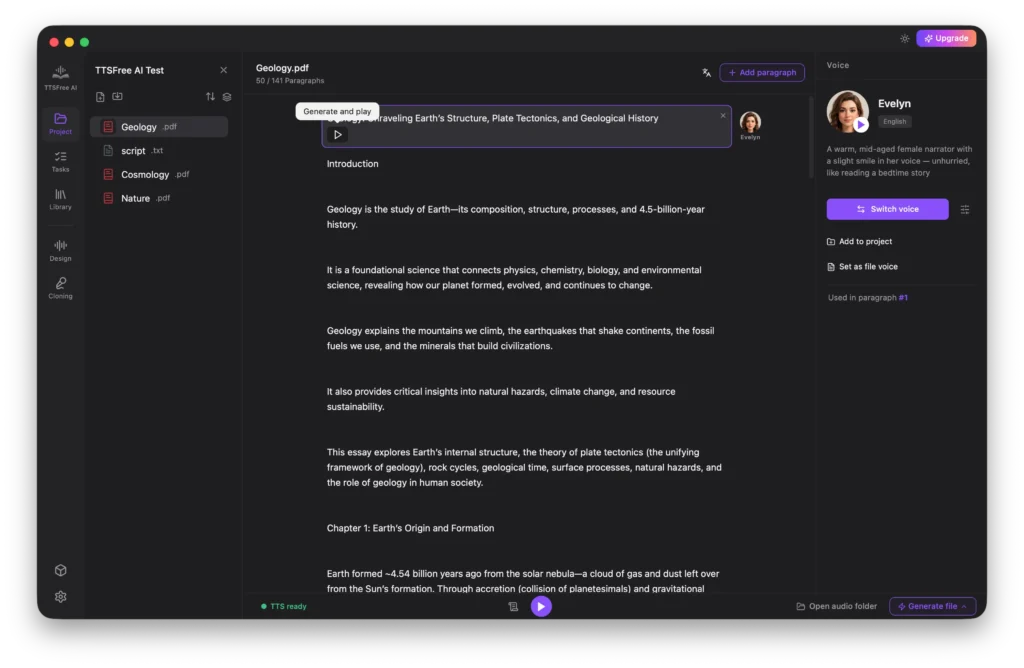
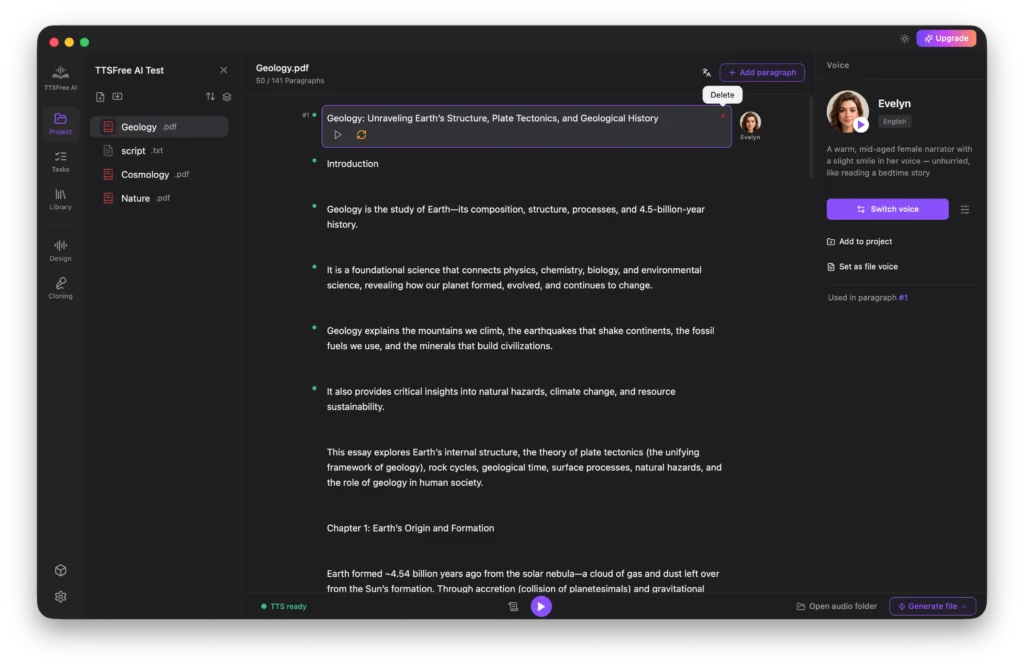
For standard non-script files, the app selects a default voice based on your language settings. To change it, click the voice avatar to switch voices, or highlight a specific paragraph and use the Switch Voice button in the right panel.
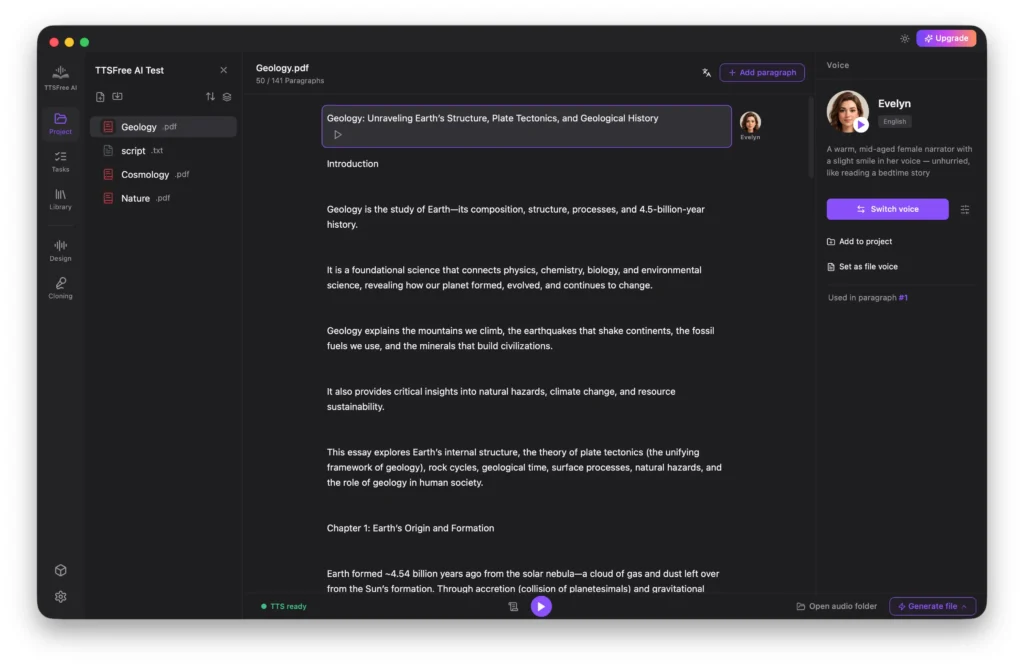
After selecting a voice, you can click Set as File Voice to apply it to the entire document, or assign different voices to individual paragraphs depending on your needs.
Next to the Switch Voice button, you will find the Voice Options button. Click it to adjust the speed, pitch, and volume of your selected voice.
Once your voice is configured, you are ready to generate audio. You can click the Generate and Play button beneath any paragraph to preview the result.
Or go to Generate File > Generate All to convert the entire document at once.
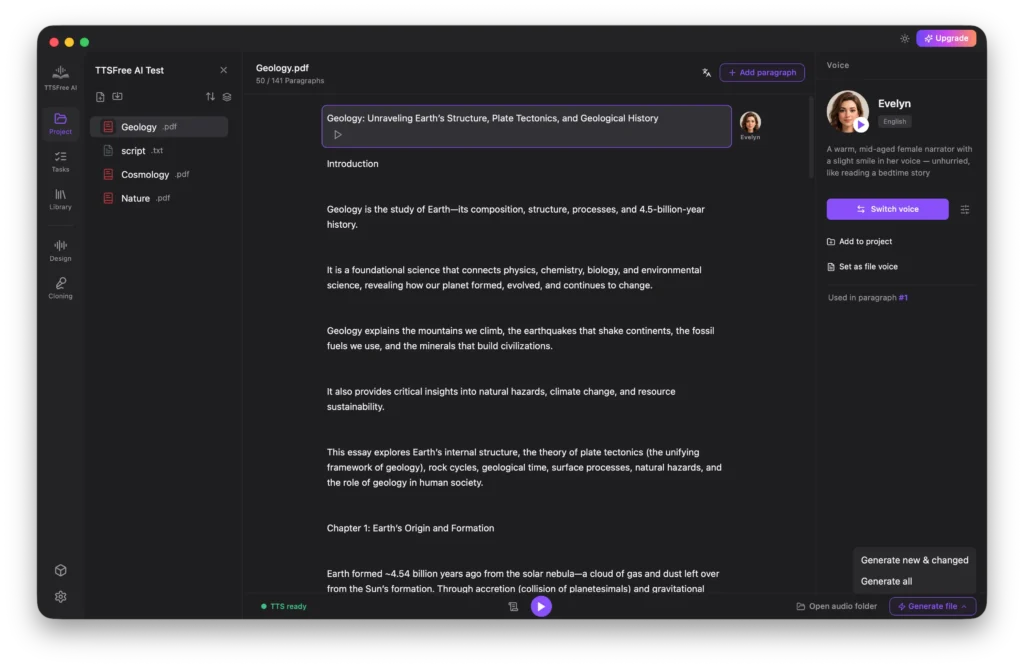
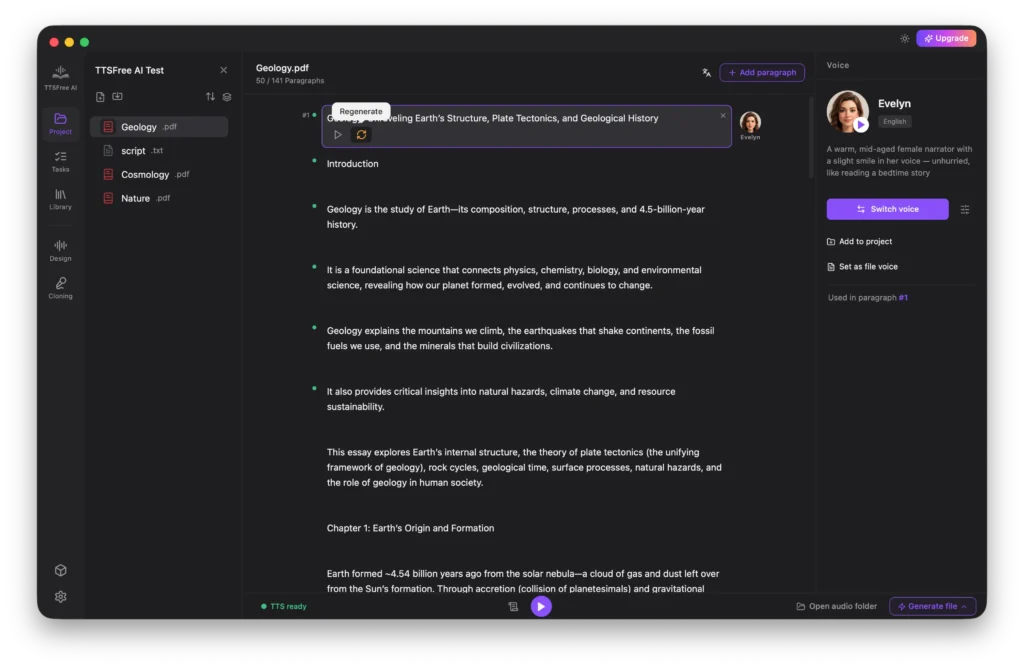
If you want to try a different voice or regenerate the current paragraph, simply click the Regenerate icon. If you have updated voices across multiple paragraphs, use Generate File > Generate New & Changed to process only the updated sections in bulk.
After generation is complete, click Play All to listen to all audio files sequentially. While playing, you can enable the Auto-scroll While Reading or Generating icon next to the Play All button. This keeps the view synced with the playback progress so the screen follows along as the audio plays.
To access your output, click the Open Audio Folder button. By default, this folder contains individual audio files for each paragraph as well as a single merged file of all generated content. Note that the merged file is only available when using the Generate File option.
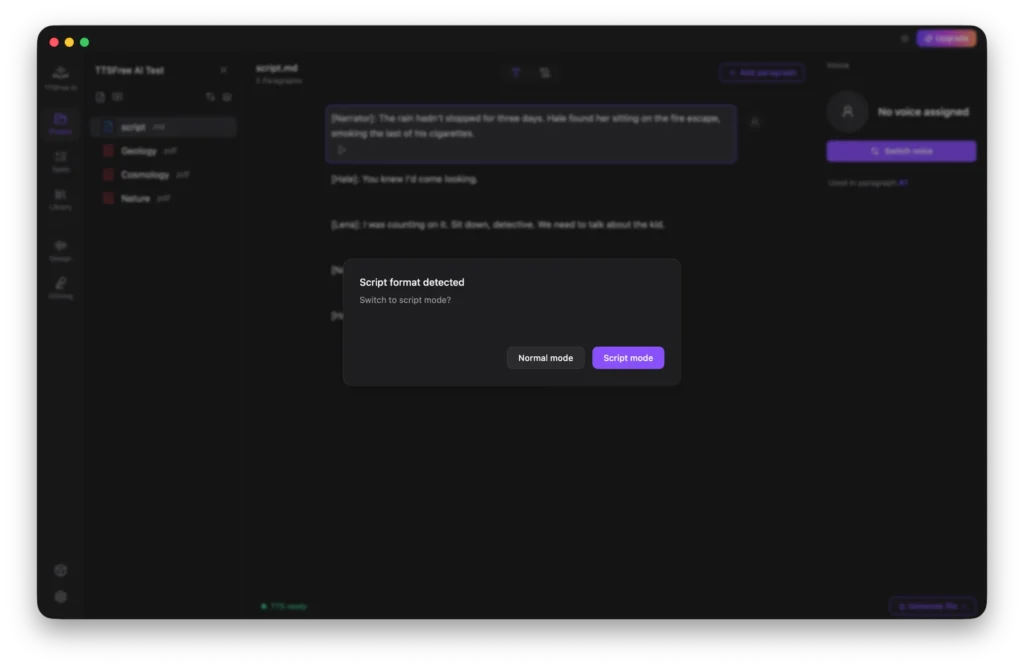
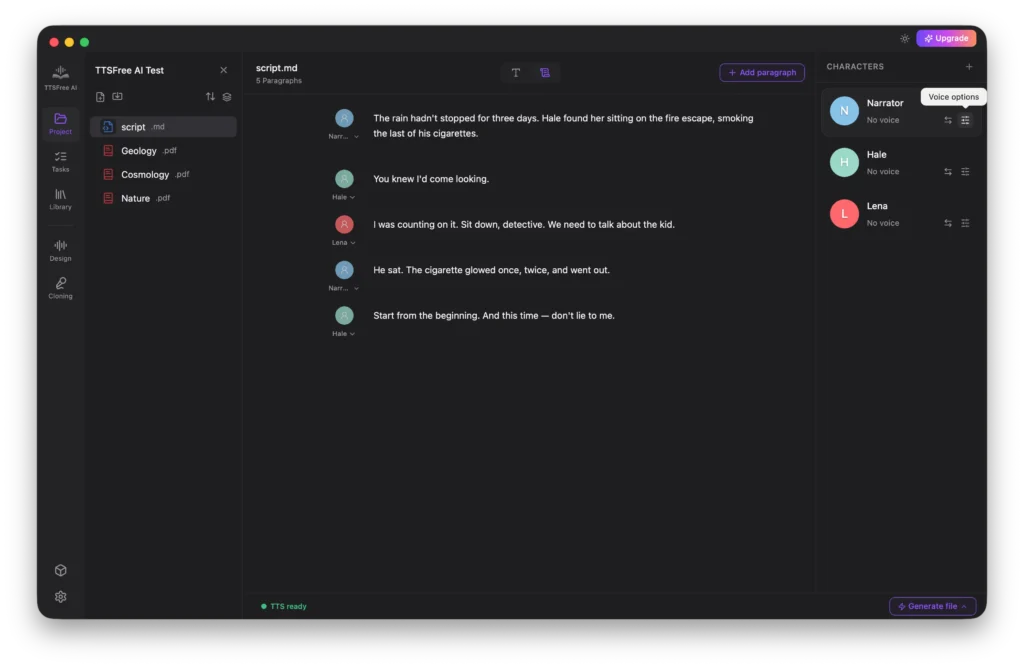
Working with Script Mode
In addition to common documents, TTSFree AI fully supports script files. When you open a script, the app will automatically detect the format and ask if you would like to enter Script Mode. You can then choose between Script Mode and Normal Mode based on your preference.
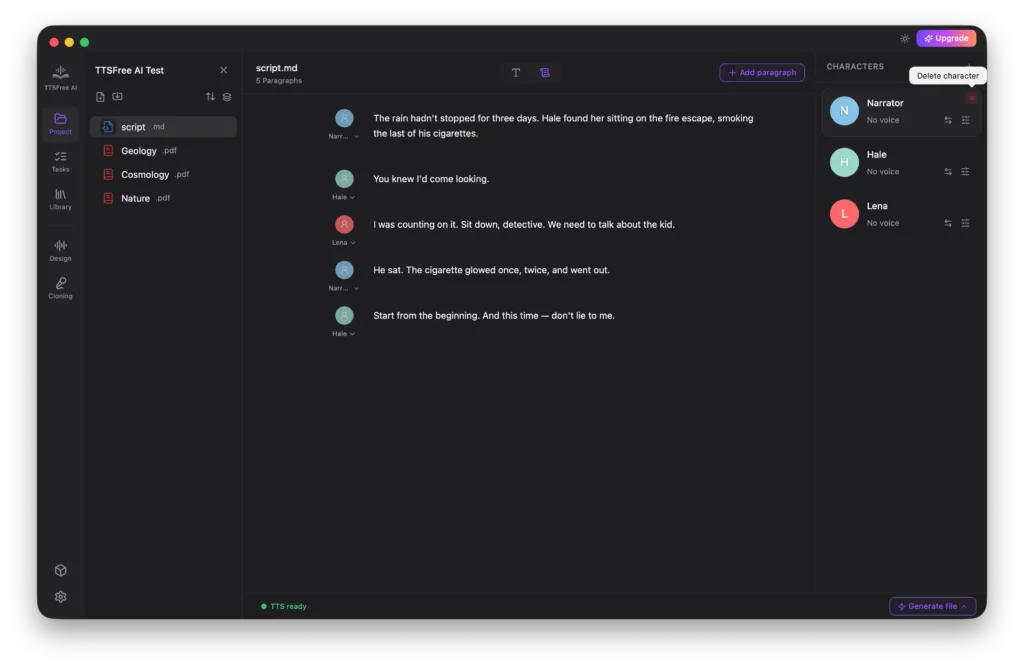
If you select Script Mode, the app will automatically identify all characters in the script and list them in the right panel. You can configure a unique voice for each character by clicking their avatar or using the Switch Voice button.
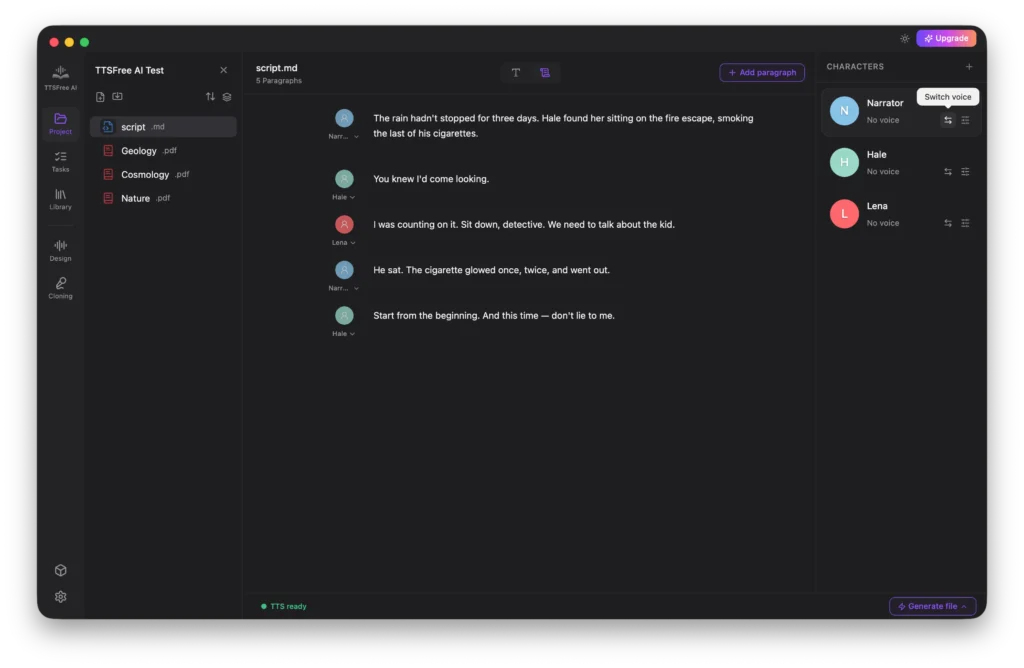
After selecting a voice, click Voice Options to customize the speed, pitch, and volume for that specific character.
To remove a character from the list, simply click the Delete icon in the top right corner of their profile.
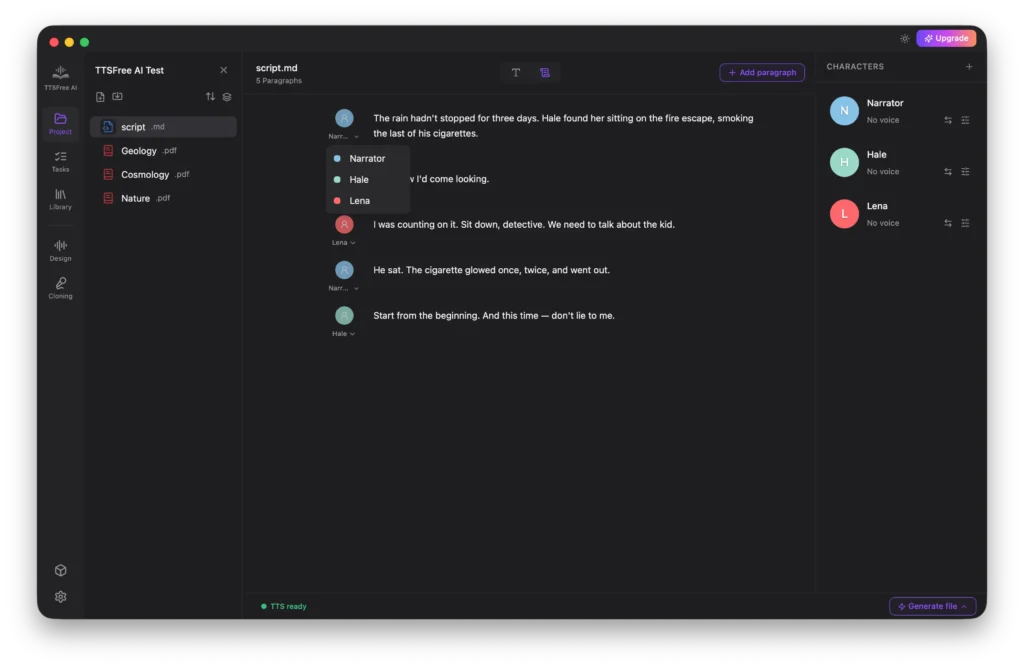
If you need to reassign a character for a specific paragraph, click the avatar next to that line and select your desired character from the dropdown menu.
Audio generation and playback features work exactly the same as in Normal Mode, so please refer to the previous section for those instructions.
Editing and Managing Files
TTSFree AI includes basic editing tools so you can add or remove paragraphs directly within the app. Please note that these edits are non-destructive and will never modify your original source files.
To create a blank text file within the project, click the New Text icon.
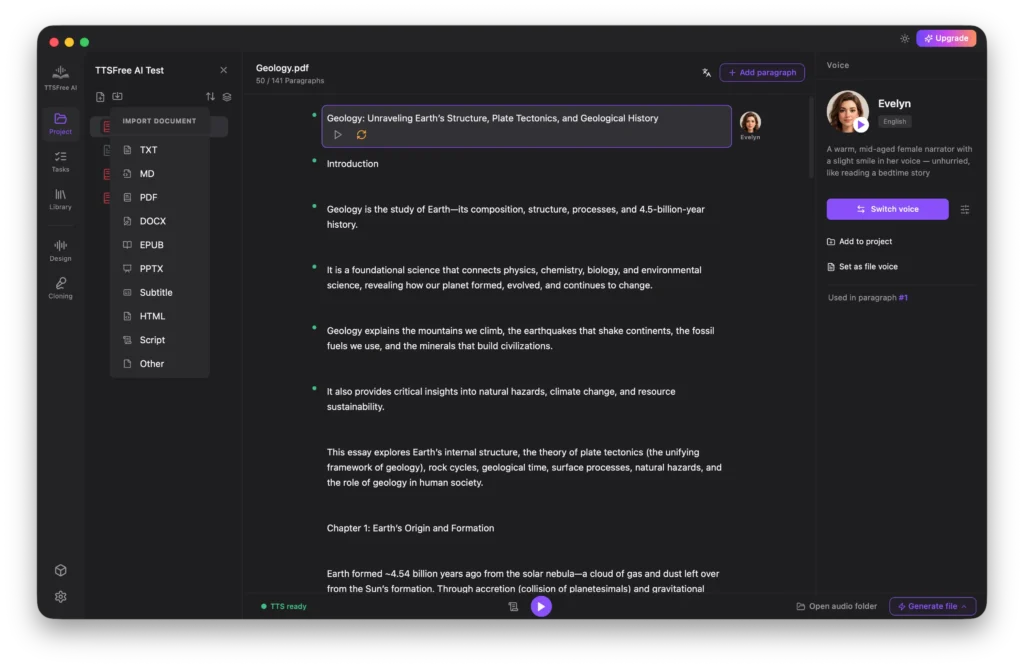
You can also import existing files by clicking the Import Document icon.
Supported formats include TXT, MD, PDF, DOCX, EPUB, PPTX, subtitles (VTT, SRT, LRC, ASS), HTML, Script, and more.
If you need to reset a document, click the Trash icon.
This clears all editing history and returns the file to the pending state, allowing you to reconfigure voices and regenerate from scratch.
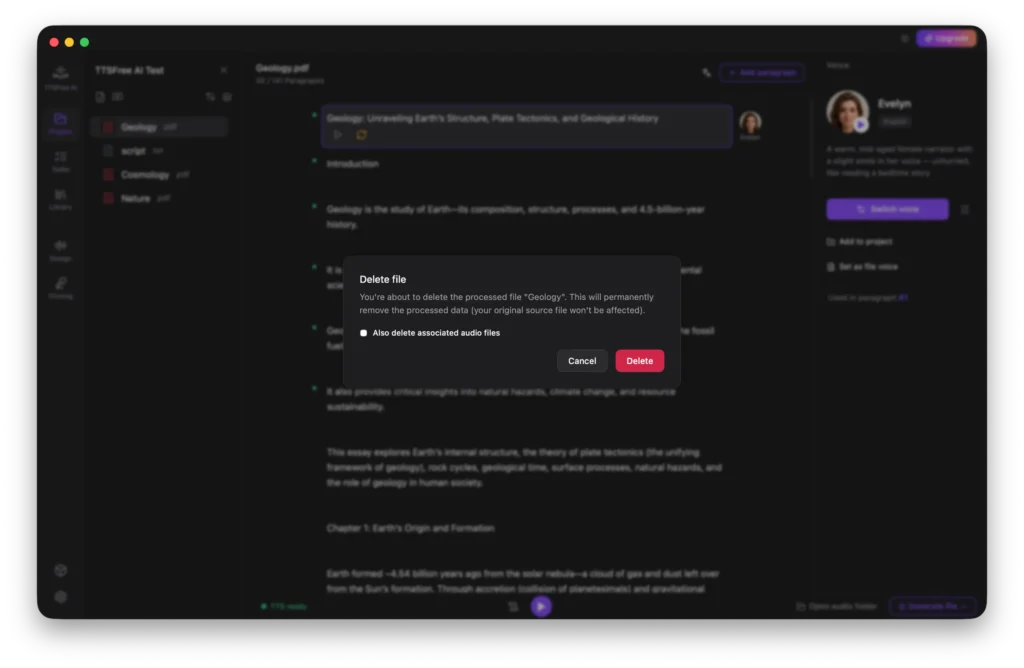
To permanently remove a file from the project, click the Delete icon next to any pending file.
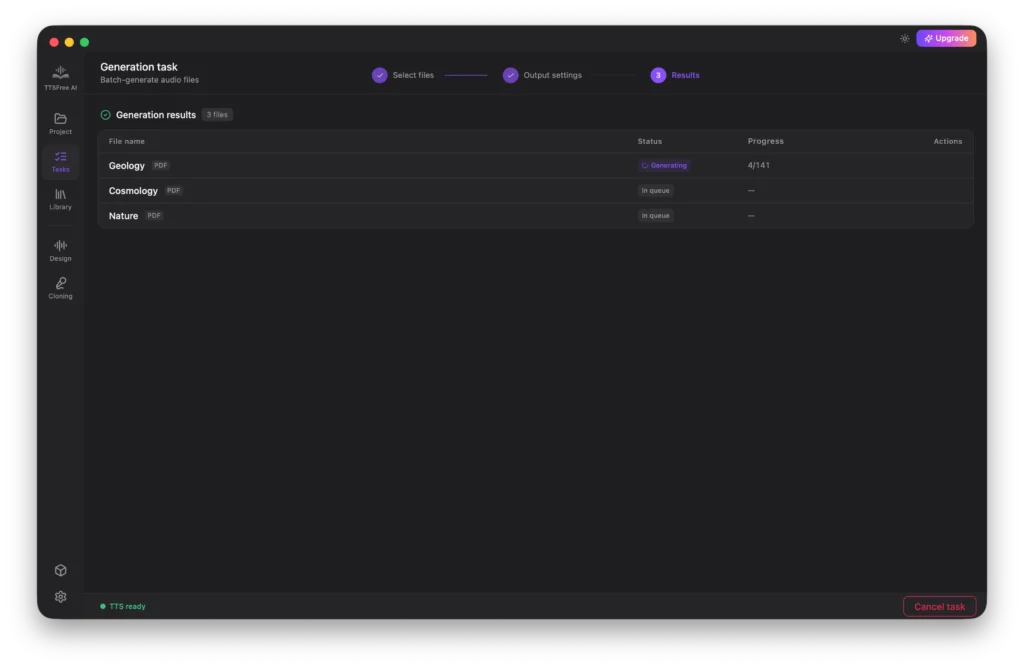
Tasks: How to Bulk Convert Files to Speech
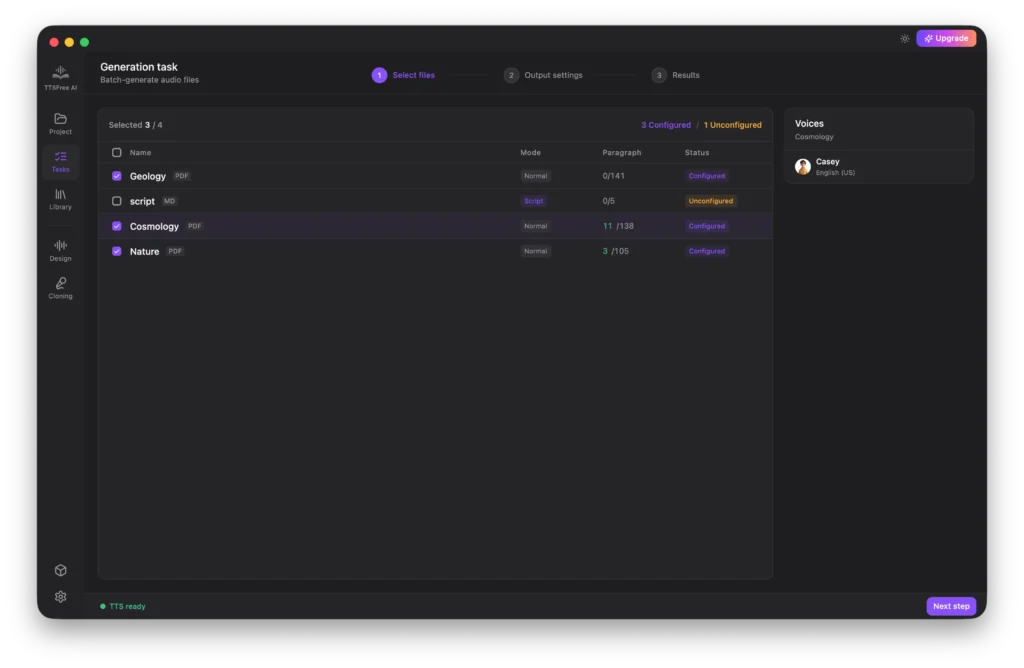
When you have multiple files to process, the Tasks feature is your best option for efficient batch conversion. Once you have configured the voice settings for each document, simply switch to the Tasks tab to begin.

Select the files you want to convert and click Next Step. Please note that only files marked as Configured can be processed. These are documents where voice options have already been set up. Files listed as Unconfigured do not have voice assignments yet and cannot be included in the batch generation.
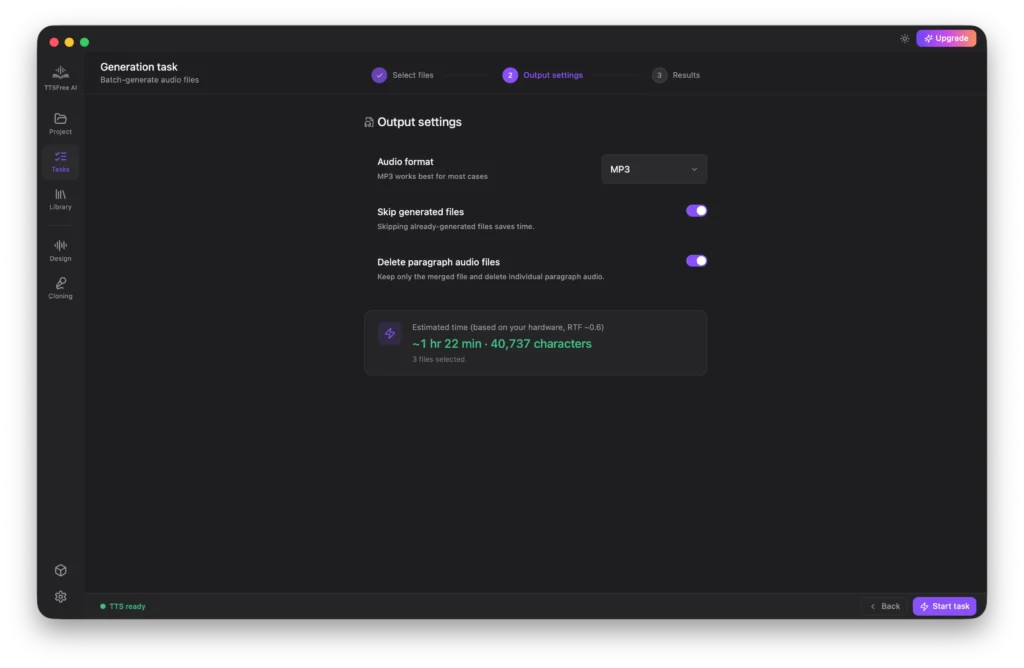
Next, configure your output settings. You can choose between MP3 format for smaller file sizes, or WAV format for lossless audio quality with larger file sizes. You also have the option to skip paragraphs that have already been generated and decide whether to delete individual paragraph audio files after merging. The system will display an estimated completion time based on your current settings.
Once everything is set, click Start Task to begin the bulk generation.
TTSFree AI will display the real-time generation progress on screen. You can cancel the task at any time if needed, and any audio that has already been generated will remain safely saved in your output folder.
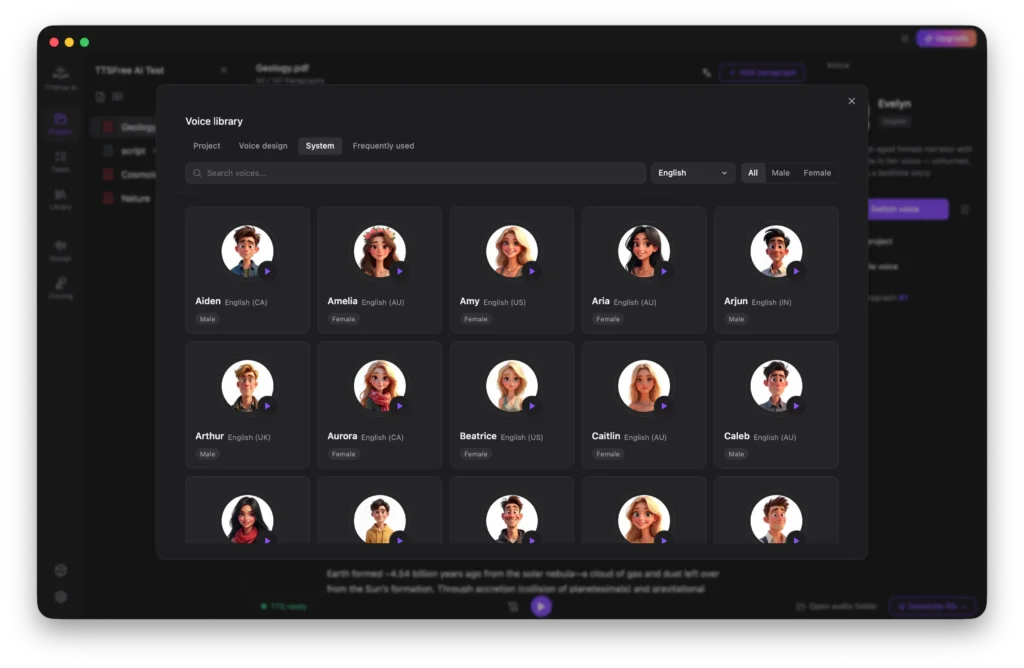
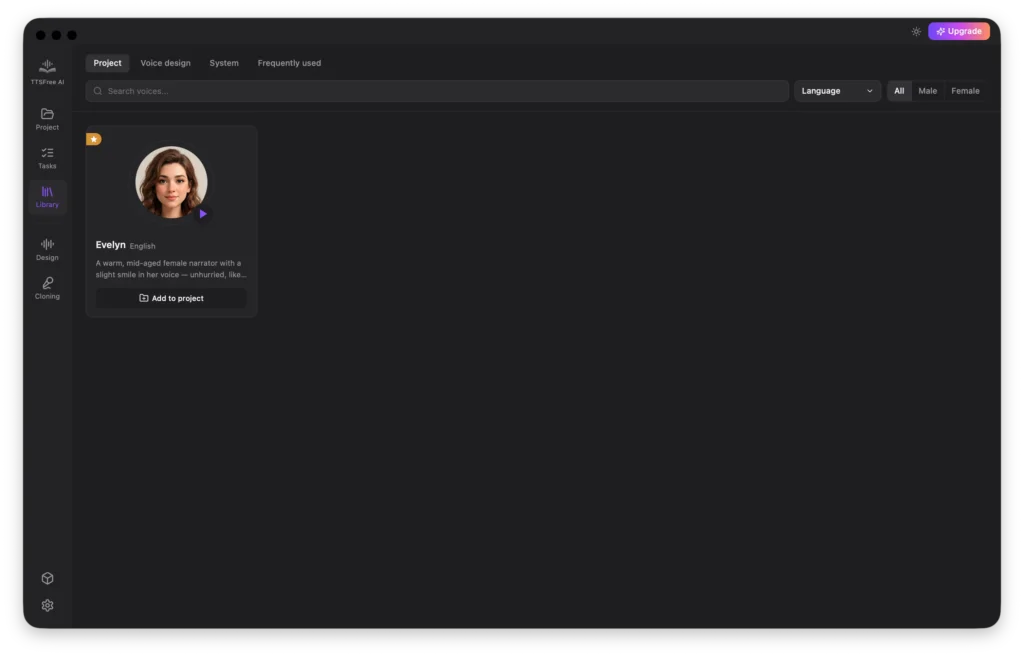
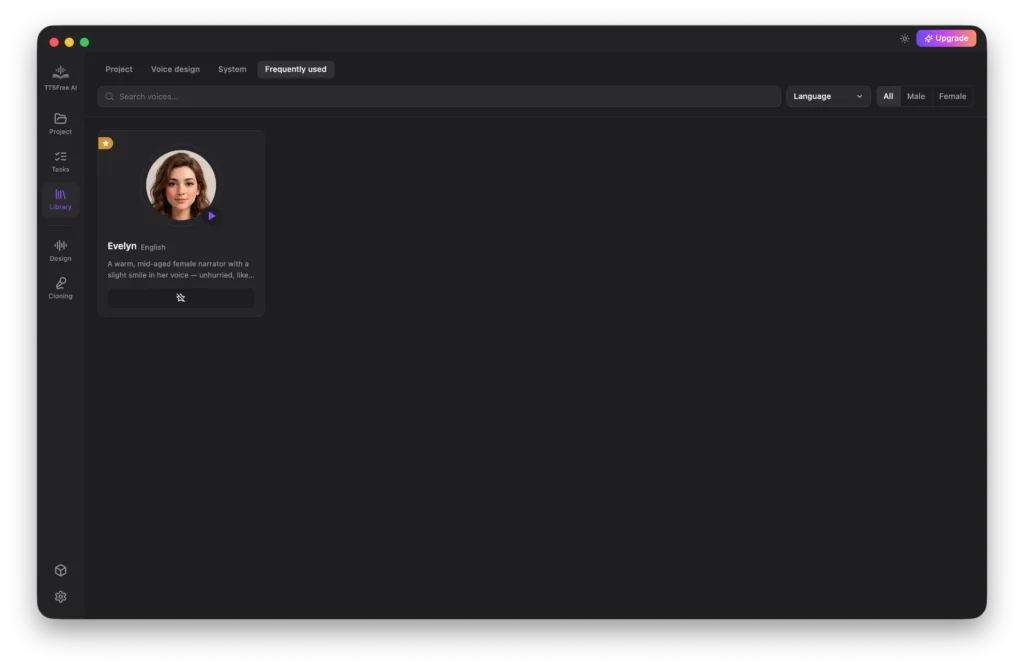
Library: How to Manage Your Voices
The Library is your central hub for viewing and managing all available AI voices. It is organized into four distinct tabs to help you find exactly what you need.
Project
This tab displays all the voices currently added to your active document project. If you no longer need a specific voice for your current work, you can easily remove it from the project here.
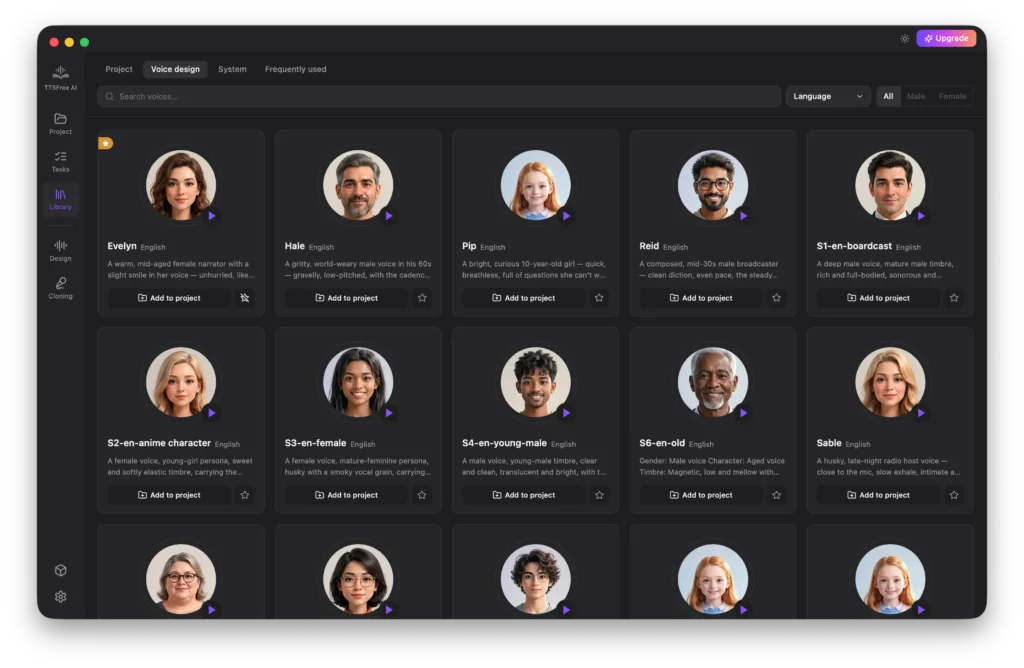
Voice Design
Here you will find all the custom voices you have created using the Design feature. You can add any of these voices to your current project or save them to your Frequently Used list for quick access later. To remove a custom voice, simply hover over it and click the delete icon.
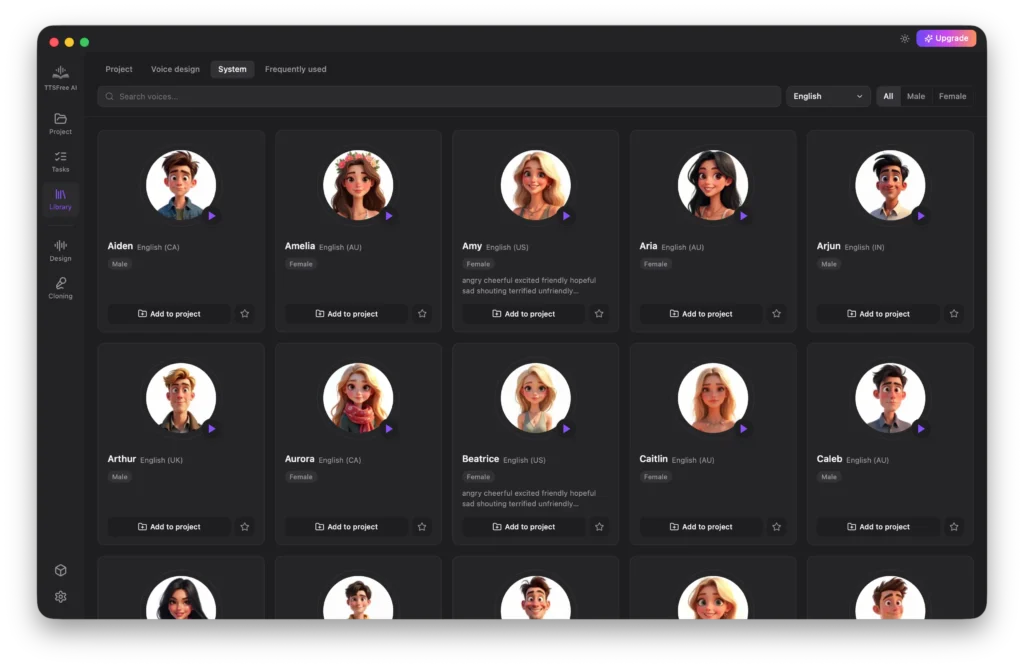
System
This tab contains all built-in system voices across multiple languages including English, French, German, Portuguese, Spanish, Italian, Chinese, Japanese, and Korean. You can use filters like language and gender to quickly narrow down the list and find the perfect voice for your needs.
Frequently Used
This tab acts as your personal favorites list, storing all the voices you use most often so you can access them instantly without searching through the full library every time.
Voice Design: How to Create Your Own AI Voices
TTSFree AI includes a powerful Voice Design feature that lets you customize AI voices to match your exact preferences. This feature offers two distinct options: Voice Design for generating entirely new voices from text prompts, and Voice Fine-tuning for modifying existing voices to better suit your needs.
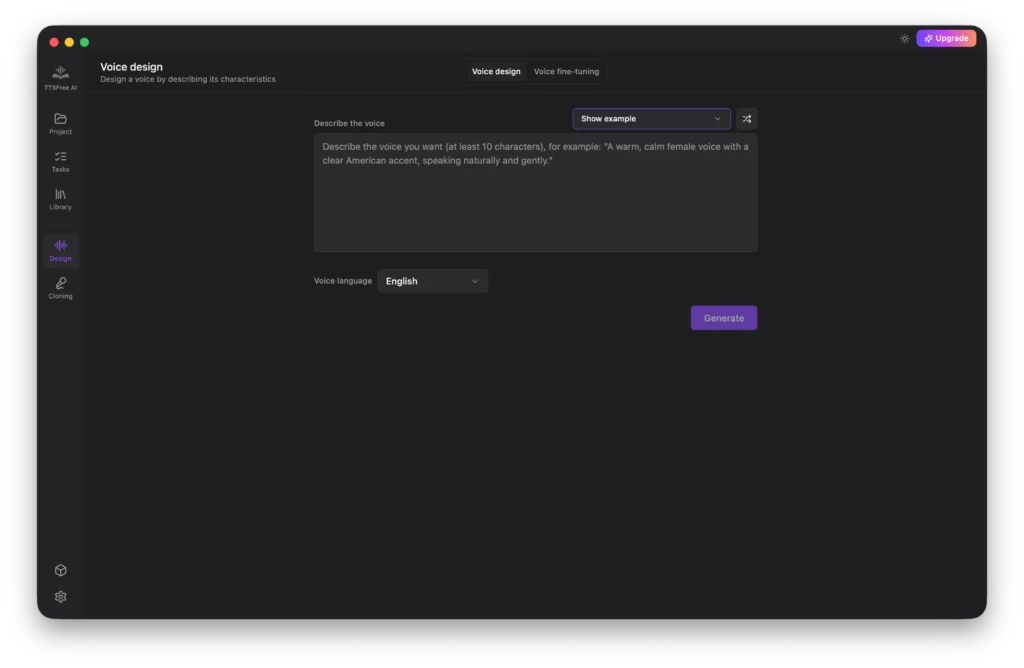
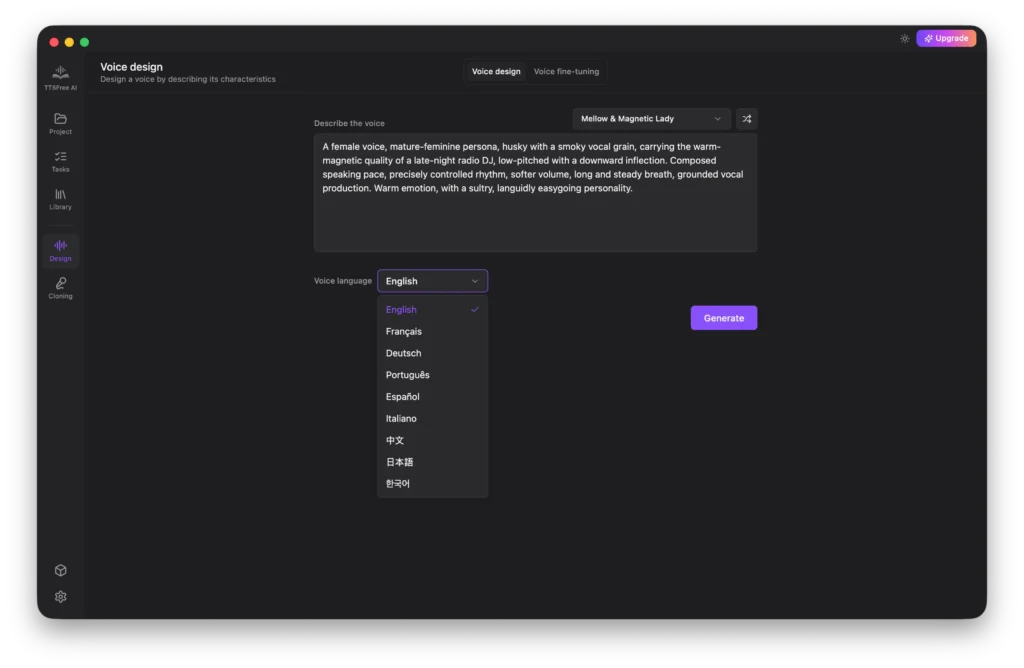
Voice Design
Start by entering a descriptive prompt for the voice you want to create. If you need inspiration, you can select ready-made options from the Show Example dropdown list.
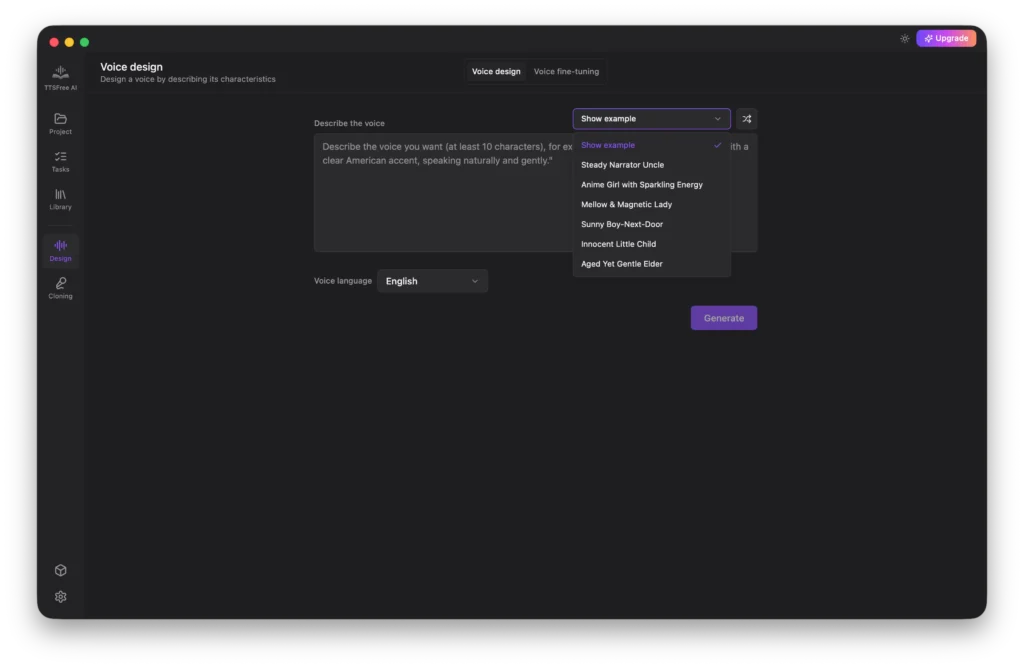
You can also click the Random Prompt icon to instantly generate a creative prompt for your new voice.
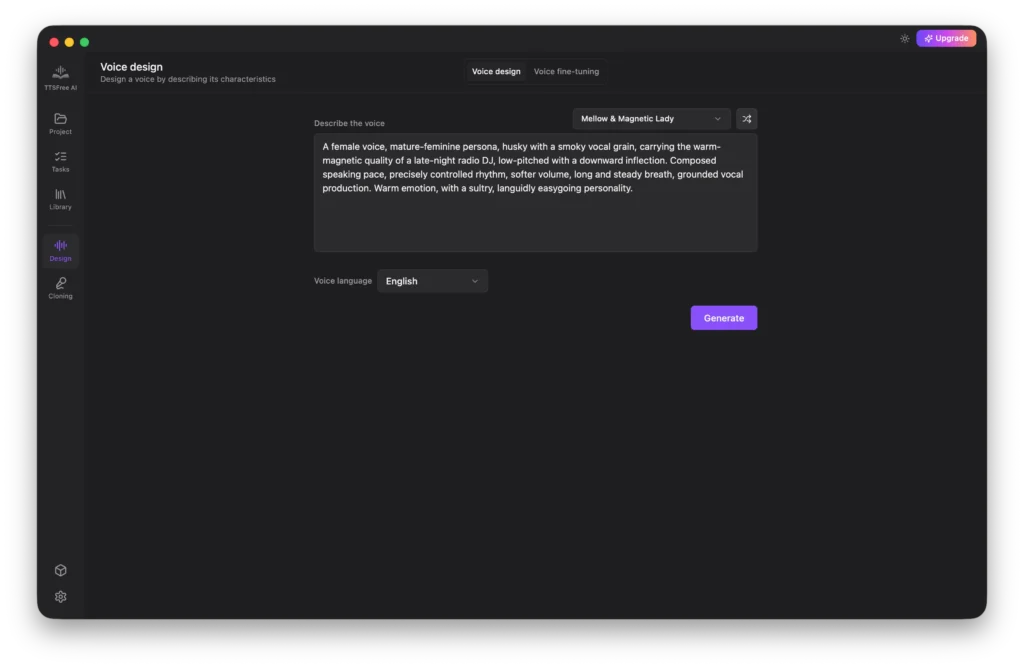
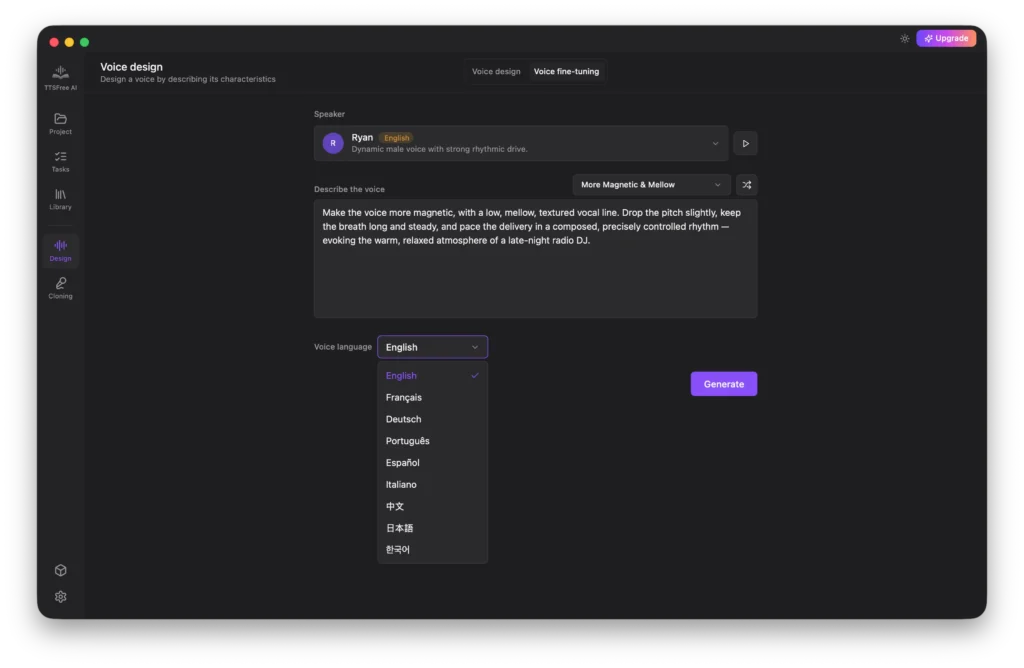
Next, select your target language and click Generate.
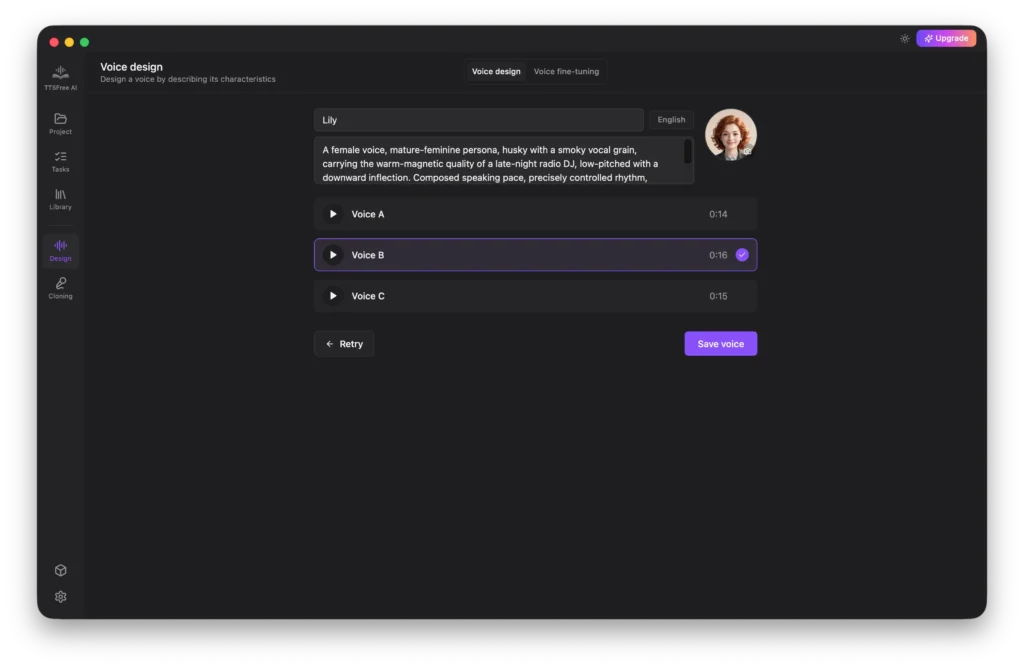
The app will take a moment to create the voices. Once ready, you can preview each result directly in the interface.
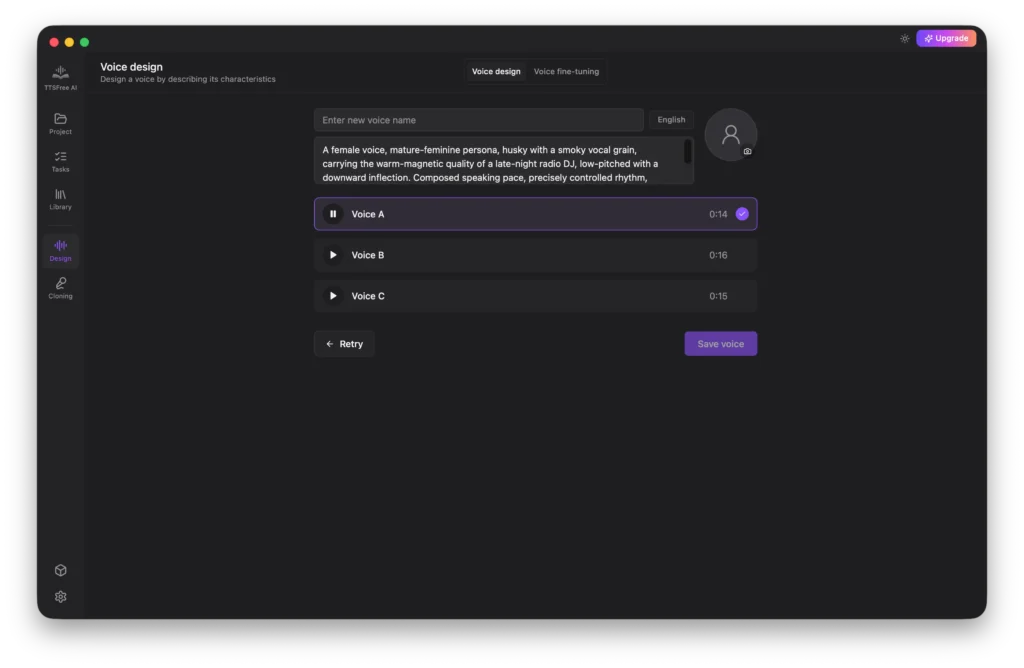
When you find a voice you love, give it a name, upload an avatar, and click Save Voice to add it to your library.
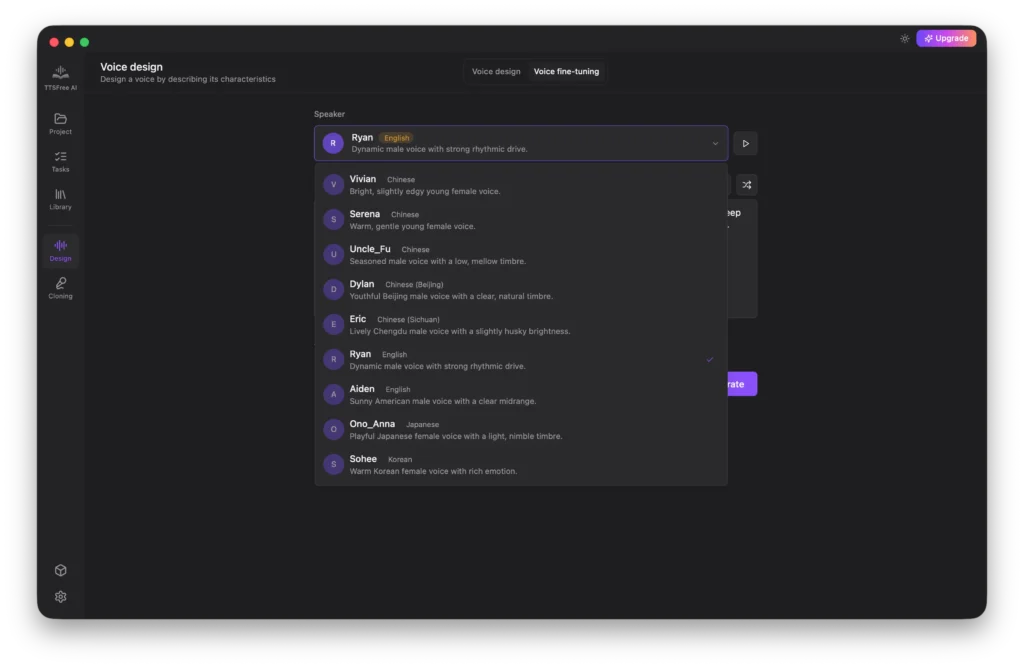
Voice Fine-tuning
Voice Fine-tuning allows you to adjust an existing voice to better align with your specific requirements.

First, select the source voice you would like to modify.
Just like with Voice Design, you can use the provided examples or the Random Prompt option to craft your adjustment prompt.
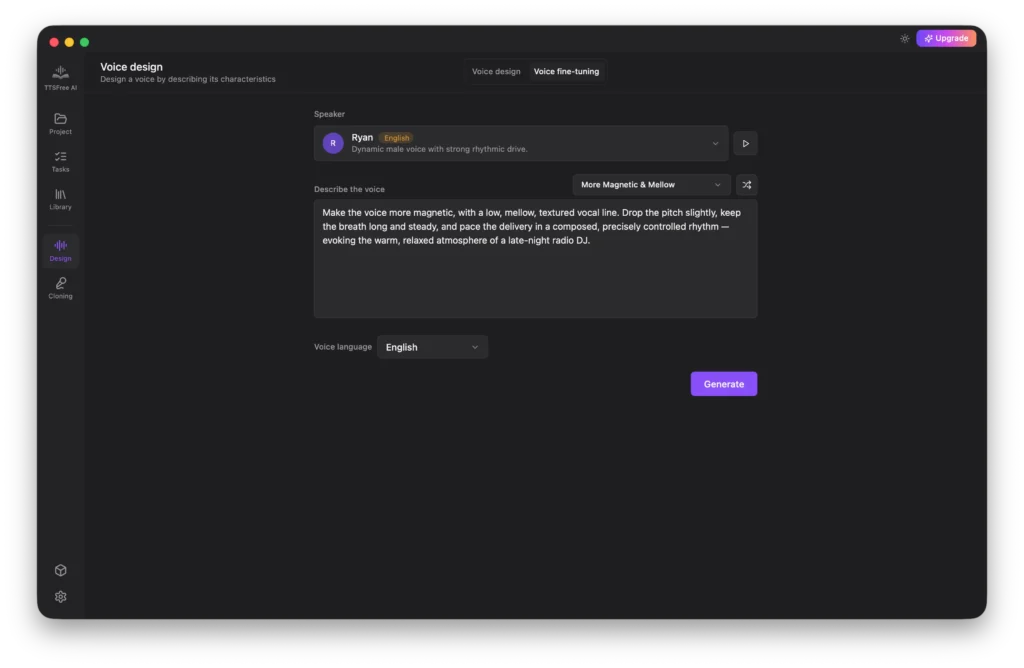
Choose your target language and click Generate.
Preview the generated variations and save the one that best meets your needs.
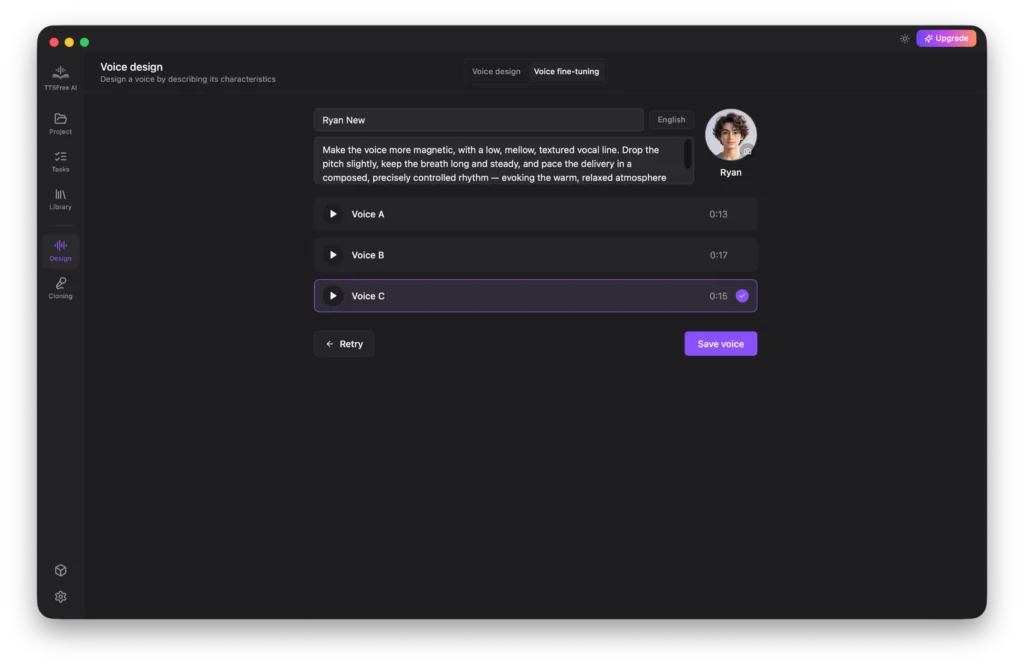
Your custom voice will now be available in your library, ready to use in any future project.
Cloning: How to Submit a Voice Cloning Request
Voice cloning is a powerful feature, but it also carries potential security and misuse risks. For this reason, we have not yet made it publicly available. If you have a specific need for voice cloning, you can click Apply for Beta Access to submit your request.
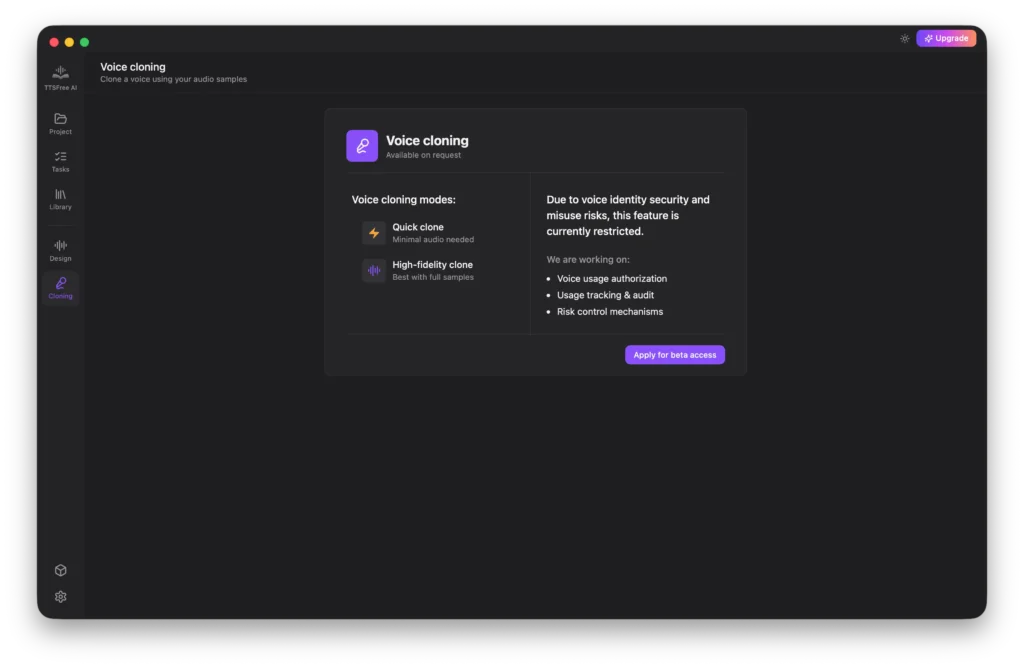
On the application form, please provide your email address, select your intended use case, and specify the voice resource you plan to use. You will also need to confirm that you have the legal right to use the target voice before clicking Submit Request.
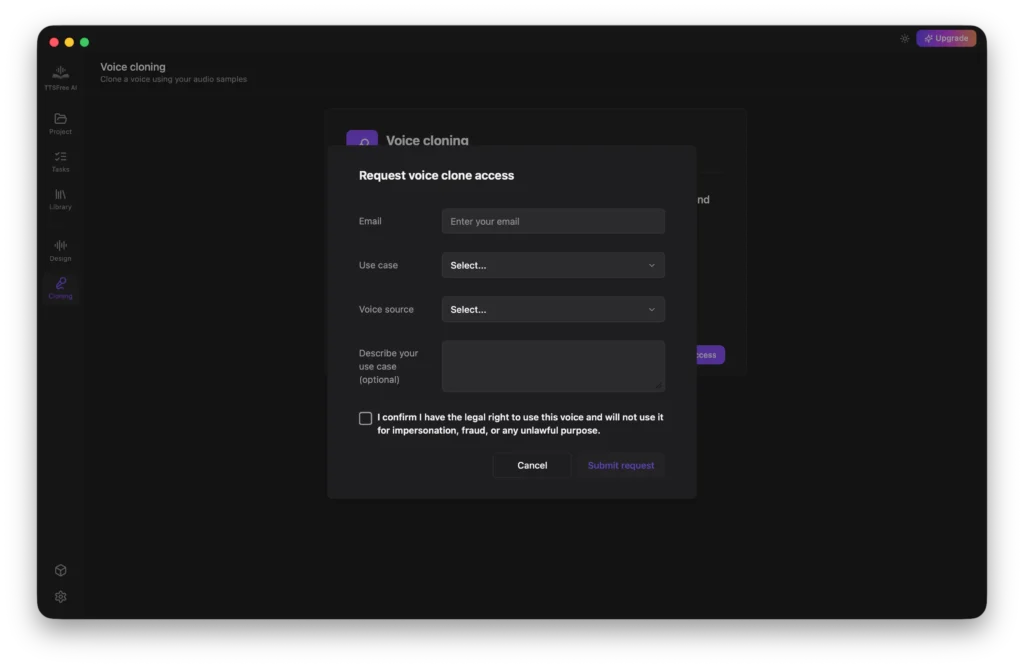
We are closely monitoring user interest in this feature. If demand is strong, we will prioritize adding voice cloning in an upcoming release. Thank you for your understanding and patience.
Model Manager: How to Select and Manage TTS Models
TTSFree AI currently offers two models for you to choose from: QWen3-TTS 1.7B for high-quality professional output, and QWen3-TTS 0.6B for a lightweight and efficient experience. You can select the model that best fits your needs and download it directly within the app.
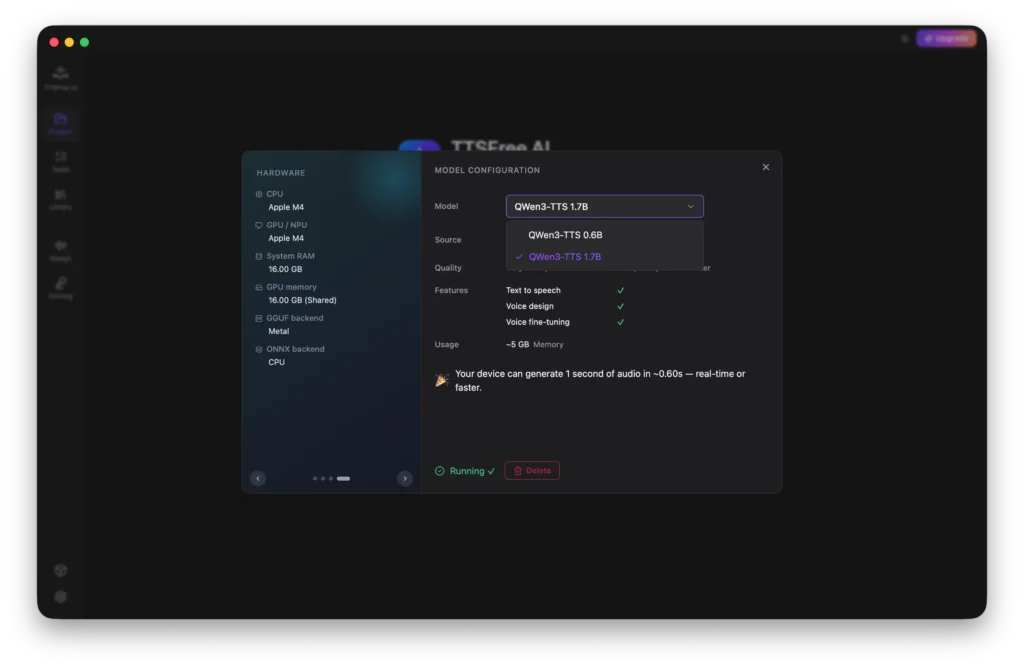
You also have the option to customize the download path so the model files are stored exactly where you prefer on your device.
If you ever need to free up space or switch models, you can easily delete any downloaded model by clicking the Download button.
Settings: How to Customize App Preferences
The Settings section allows you to adjust general preferences, customize keyboard shortcuts, and check for software updates to ensure you are always using the latest version of TTSFree AI.
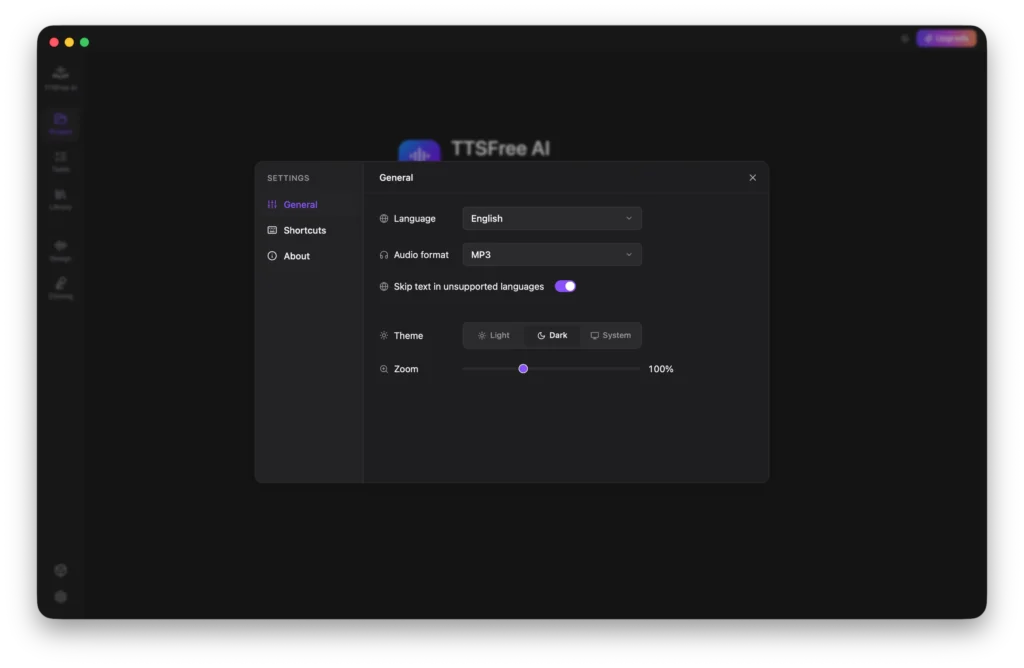
General
This tab covers all core application preferences:
• Language: Set the interface language to English, French, German, Portuguese, Spanish, Italian, Chinese, Japanese, or Korean.
• Audio Format: Choose between MP3 and WAV as your default export format.
• Skip Text in Unsupported Language: When enabled, the app will automatically skip any text segments that are not supported by the selected voice instead of generating an error or placeholder audio.
• Theme: Switch between Light mode, Dark mode, or follow your system settings automatically.
• Zoom: Adjust the interface scaling from 75% to 150% to match your display and readability preferences.
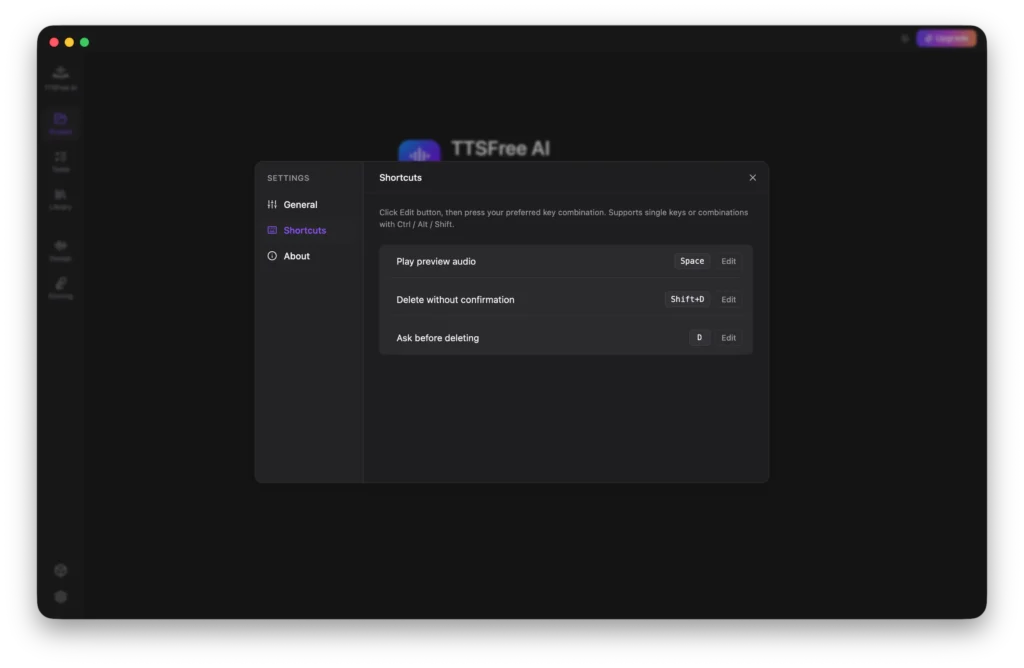
Shortcuts
Here you can view and modify keyboard shortcuts for key actions. You can set custom keys for playing audio, standard delete (which prompts for confirmation before removing content), and fast delete (which removes content immediately without a confirmation prompt).
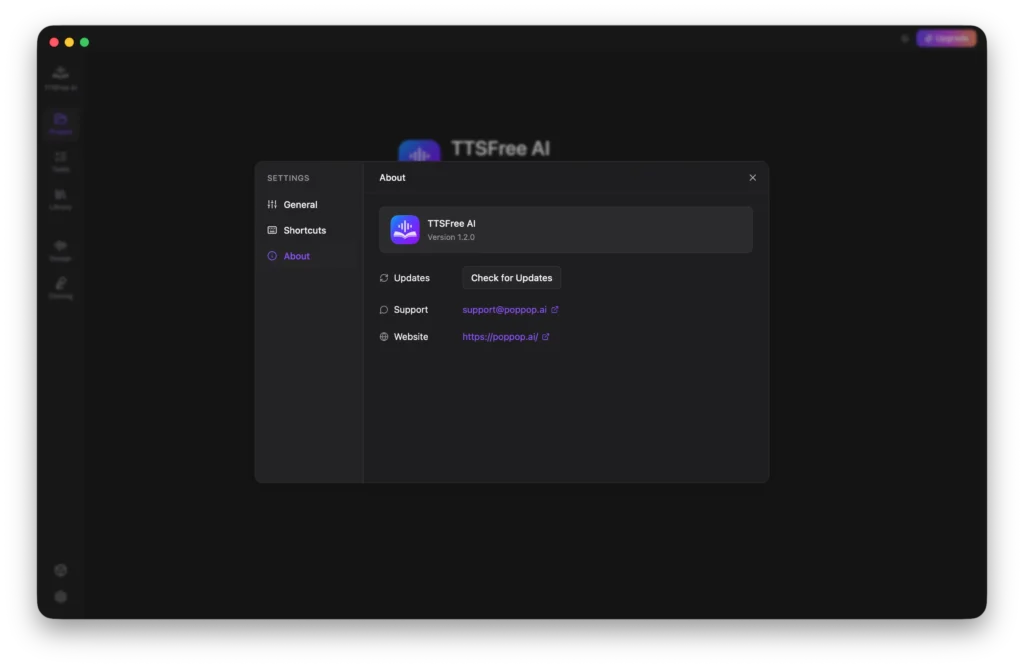
About
This tab displays your current app version and provides a quick way to check for available updates. You will also find our support email address and a link to our official website if you need further assistance or want to learn more about TTSFree AI.
FAQs: Common Text Processing Behaviors
While using TTSFree AI, you may notice a few differences between your original document and how the text appears in the editor. We want to reassure you that these are expected behaviors related to how our system parses and optimizes content for speech synthesis, not bugs.
Paragraph Breaks May Differ from the Original: The software sometimes splits or merges paragraphs differently than your source file. This happens because the engine automatically restructures text into optimal chunks for natural pacing and breath pauses during audio generation.
Extra Content May Appear: You might see additional lines or sections that were not visible in your original document. These are typically metadata elements (such as headers, footers, page numbers, or document properties) that the parser has extracted from the file structure. They are a normal part of the import process.
Occasional Extra Symbols Between Text Segments: Minor formatting characters or separators may appear between some text blocks. These artifacts do not affect the generated audio output or the readability of your script, and they can be safely ignored.
All of these behaviors are intentional design choices to ensure the highest quality text-to-speech conversion. If you encounter issues beyond these known behaviors, please feel free to reach out to our support team through the About section in Settings.
Wrapping Up
Thank you for choosing TTSFree AI! We hope this guide has helped you get comfortable with all the features and made your text-to-speech workflow smoother.
If you ever have questions, feedback, or just want to share what you’ve created, don’t hesitate to reach out at support@poppop.ai. We’re always here to help and love hearing from our users. Happy creating!
Vita3D User Guide
The Vita3D user guide provides step-by-step instructions to build stunning models, add textures, rig characters, create animations, and capture motions effortlessly, perfect for beginners and pros alike.
Introduction to Vita3D
Welcome to Vita3D, an all-in-one 3D powerhouse designed to revolutionize your creative process. Vita3D integrates 3D modeling, texturing, rigging, animation creation, and motion capture into one comprehensive toolset. Whether you’re a seasoned professional or just starting out, our platform is tailored to simplify your workflow, boost productivity, and bring your visions to life with unparalleled ease and efficiency.
Vita3D includes everything you need to go from concept to animated 3D asset:
3D Modeling: Generate 3D models from reference images or simple sketches.
Texturing: Automatically create detailed textures from photos.
Rigging: Add a skeleton to your model so it’s ready for animation.
Animation: Bring your model to life using pre-built motions or text-to-animation prompts.
Motion Capture: Upload a video and extract realistic movement to drive your character.
Assets: Organize and manage all your models, textures, and animations in one place.
Tasks: Track your ongoing and completed jobs—so you always know what’s rendering and what’s ready to use.
In the sections below, we’ll walk you through each feature step by step, along with practical tips to get the best results. Follow these guidelines, and you’ll consistently get cleaner geometry, smoother rigs, and more lifelike motion.
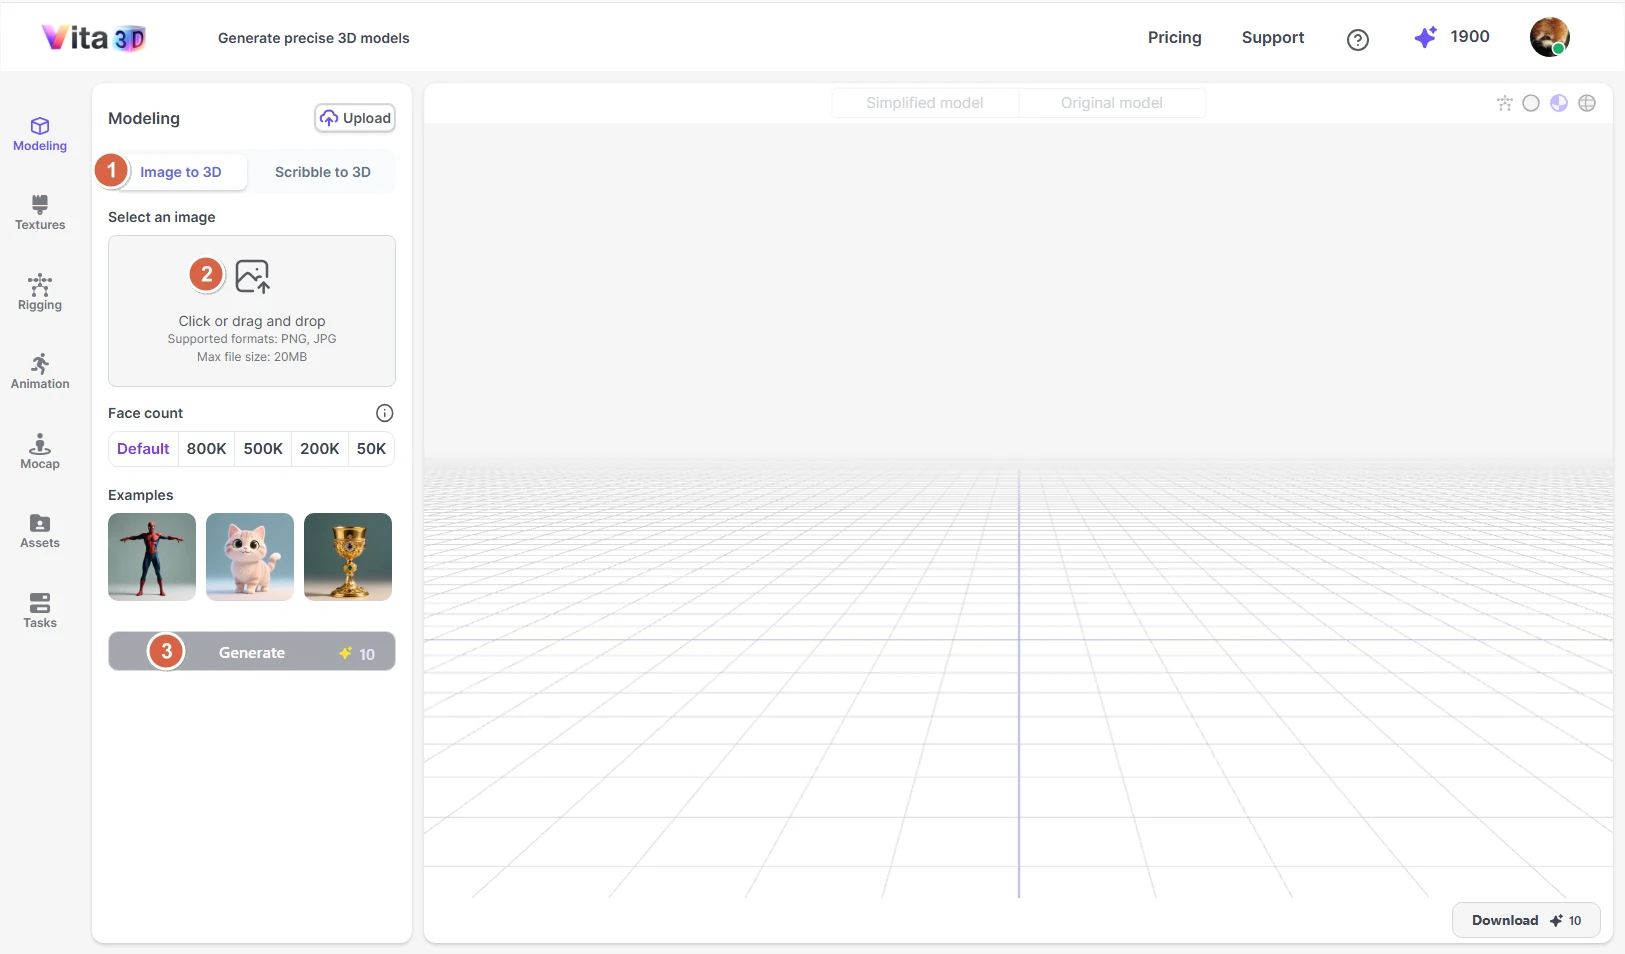
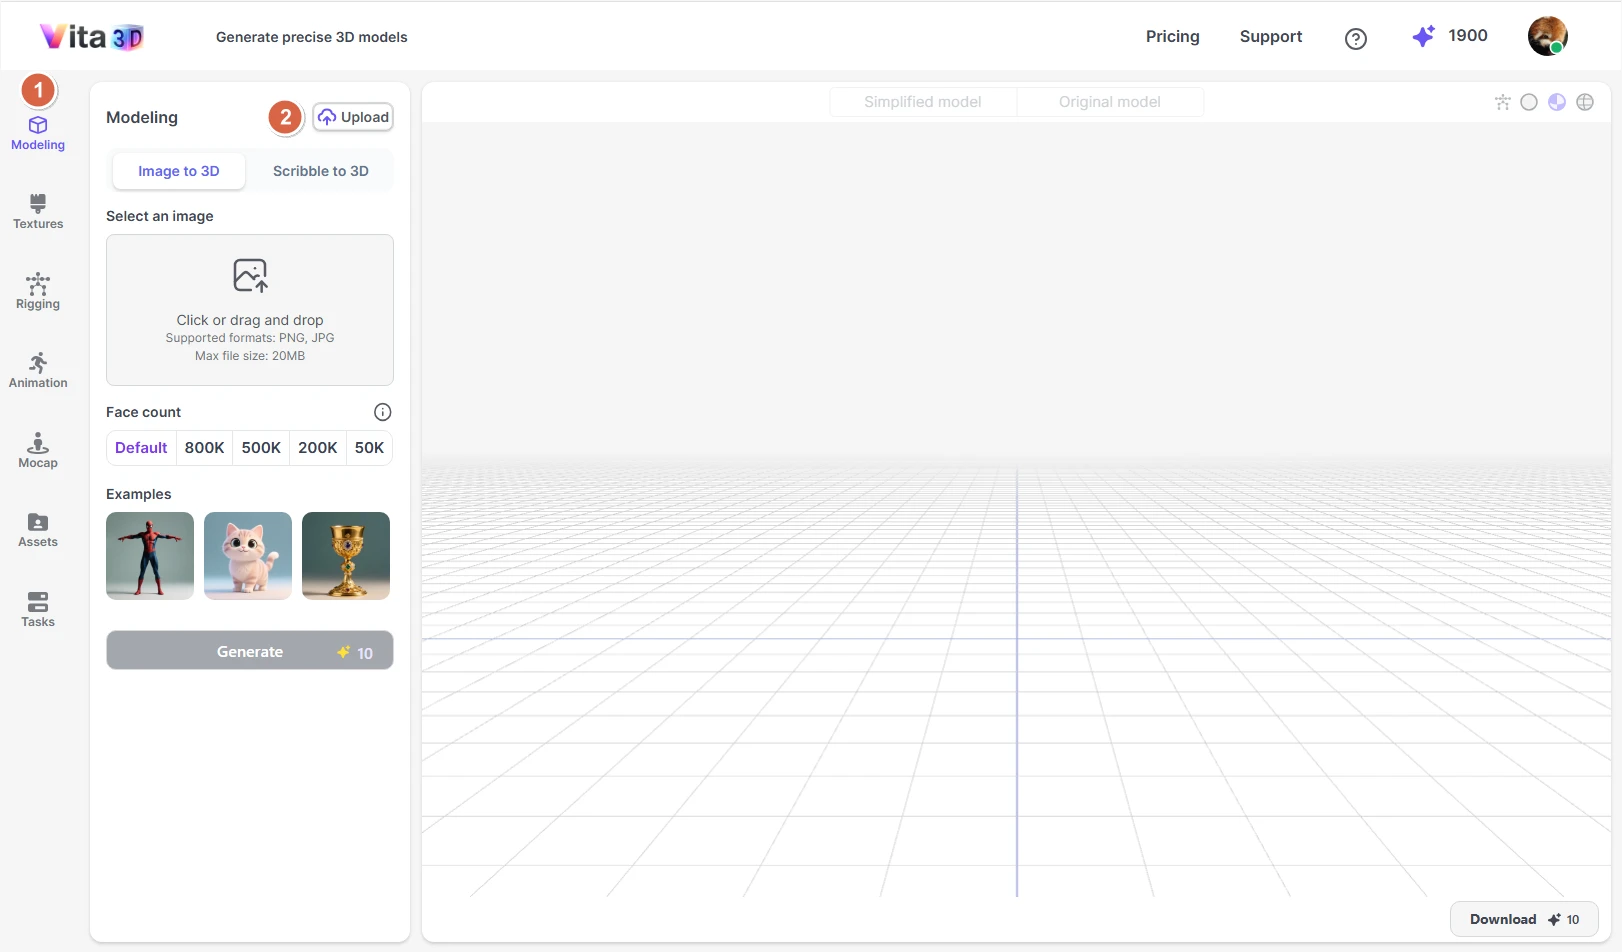
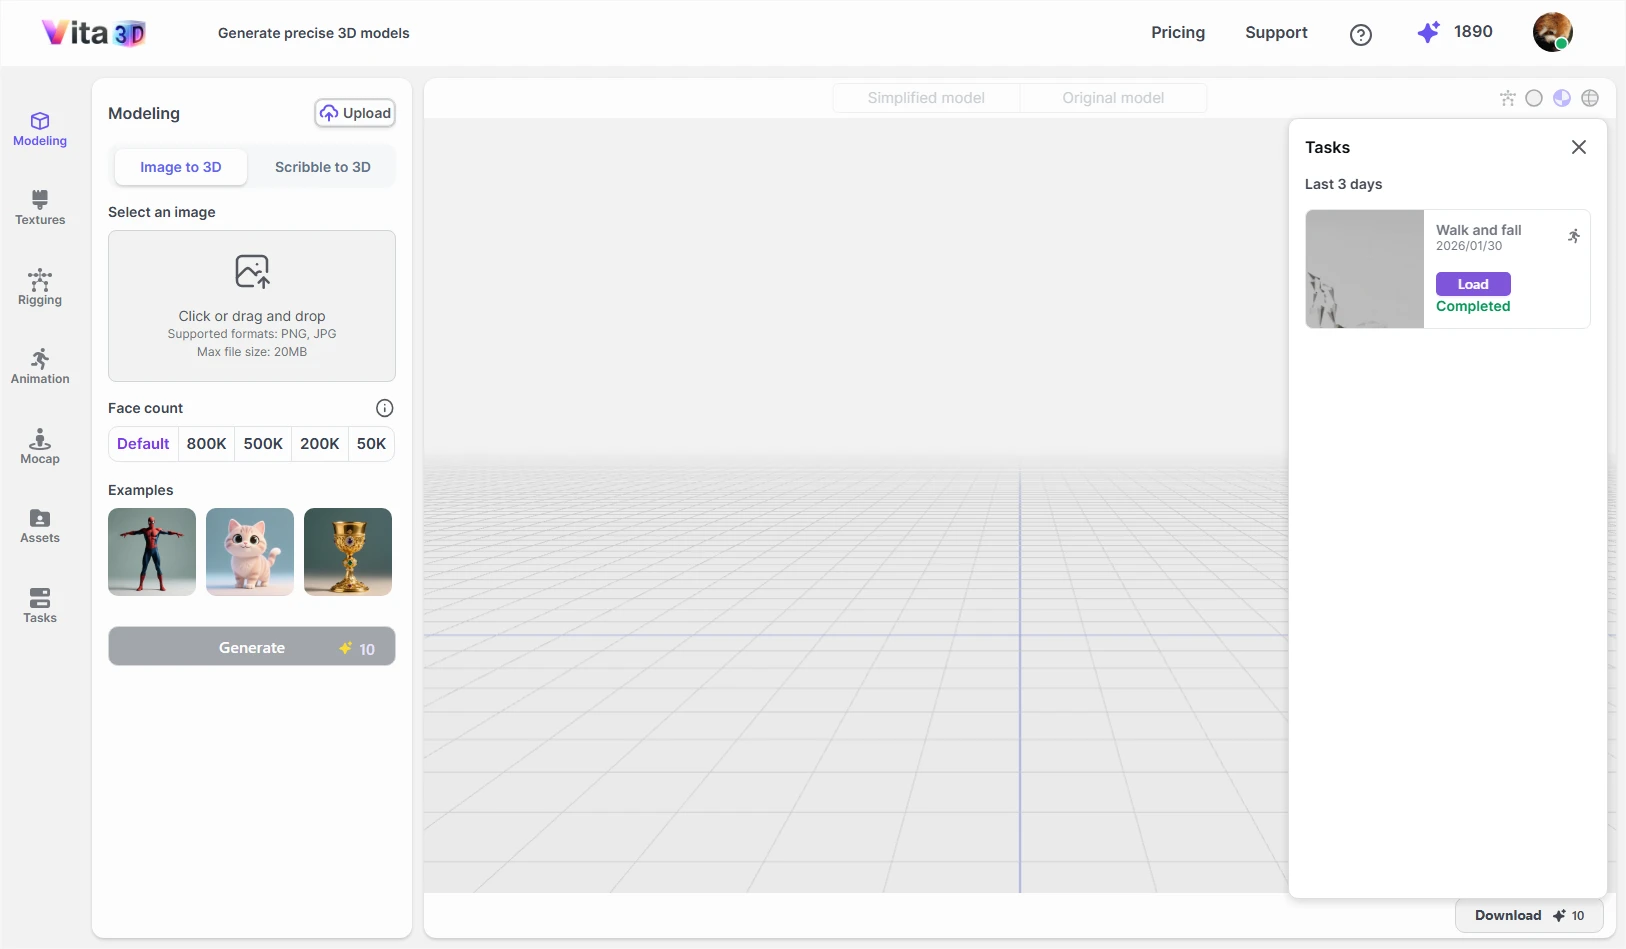
3D Modeling
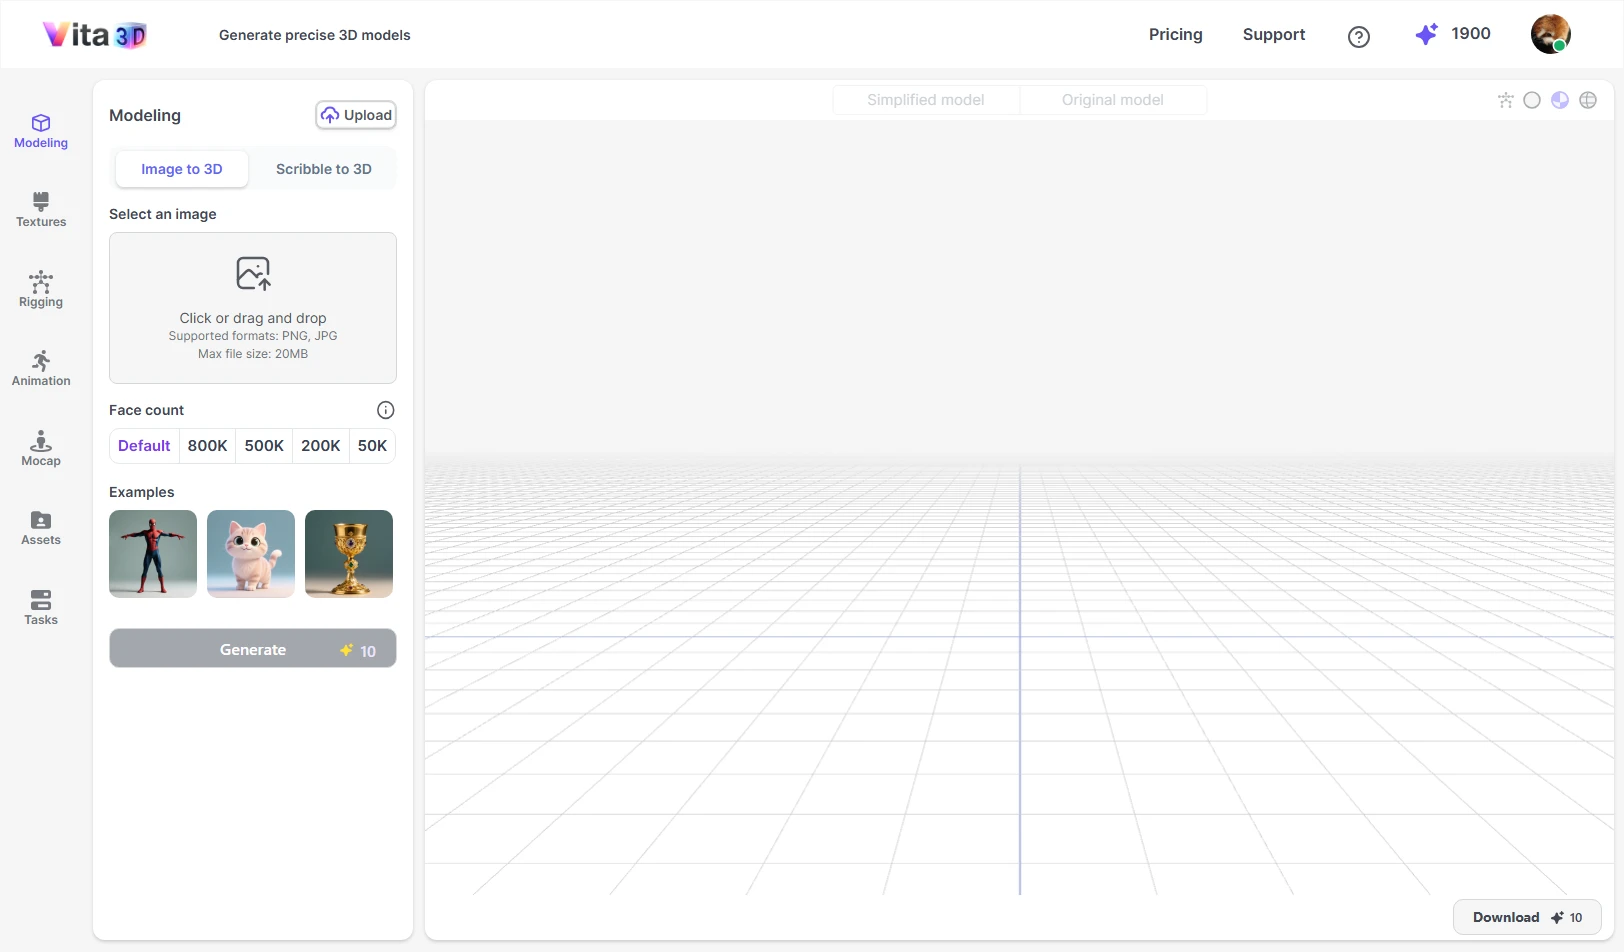
Vita3D offers three ways to create or bring in 3D models:
Image to 3D: Generate a 3D model from a single photo.
Scribble to 3D: Turn a rough sketch into a 3D model using a text prompt.
Upload Models: Import models you’ve created in other 3D software.
Image to 3D
You can upload a PNG or JPG image (up to 20 MB) to generate a 3D model. For the best results, follow these guidelines:
• Use a clean, simple background (e.g., plain white or neutral color).
• Make sure the subject is clear, fully visible, and the only main object in the image.
• Use a high-resolution image—ideally at least 1024×1024 pixels.
If you’re creating a human character, we recommend:
• Pose the subject in an A-pose or T-pose, with arms slightly away from the body.
• Keep fingers spread and palms open.
• Use a front-facing view for best accuracy.
When generating the model, you can choose between Default or set a maximum face count. Higher face counts produce more detailed geometry but use more memory and may impact performance. Since the ideal face count varies by object type, we recommend sticking with Default—our AI will automatically pick the right level of detail for your model.
How to create a 3D model from an image:
1. Go to Vita3D > Model > Image to 3D.
2. Upload your image and adjust the face count if needed.
3. Click Generate.
💡 Tips
- The initial model may look basic, but it often improves significantly after adding textures.
- Dark or underexposed areas in your image can cause holes or missing parts in the generated model.
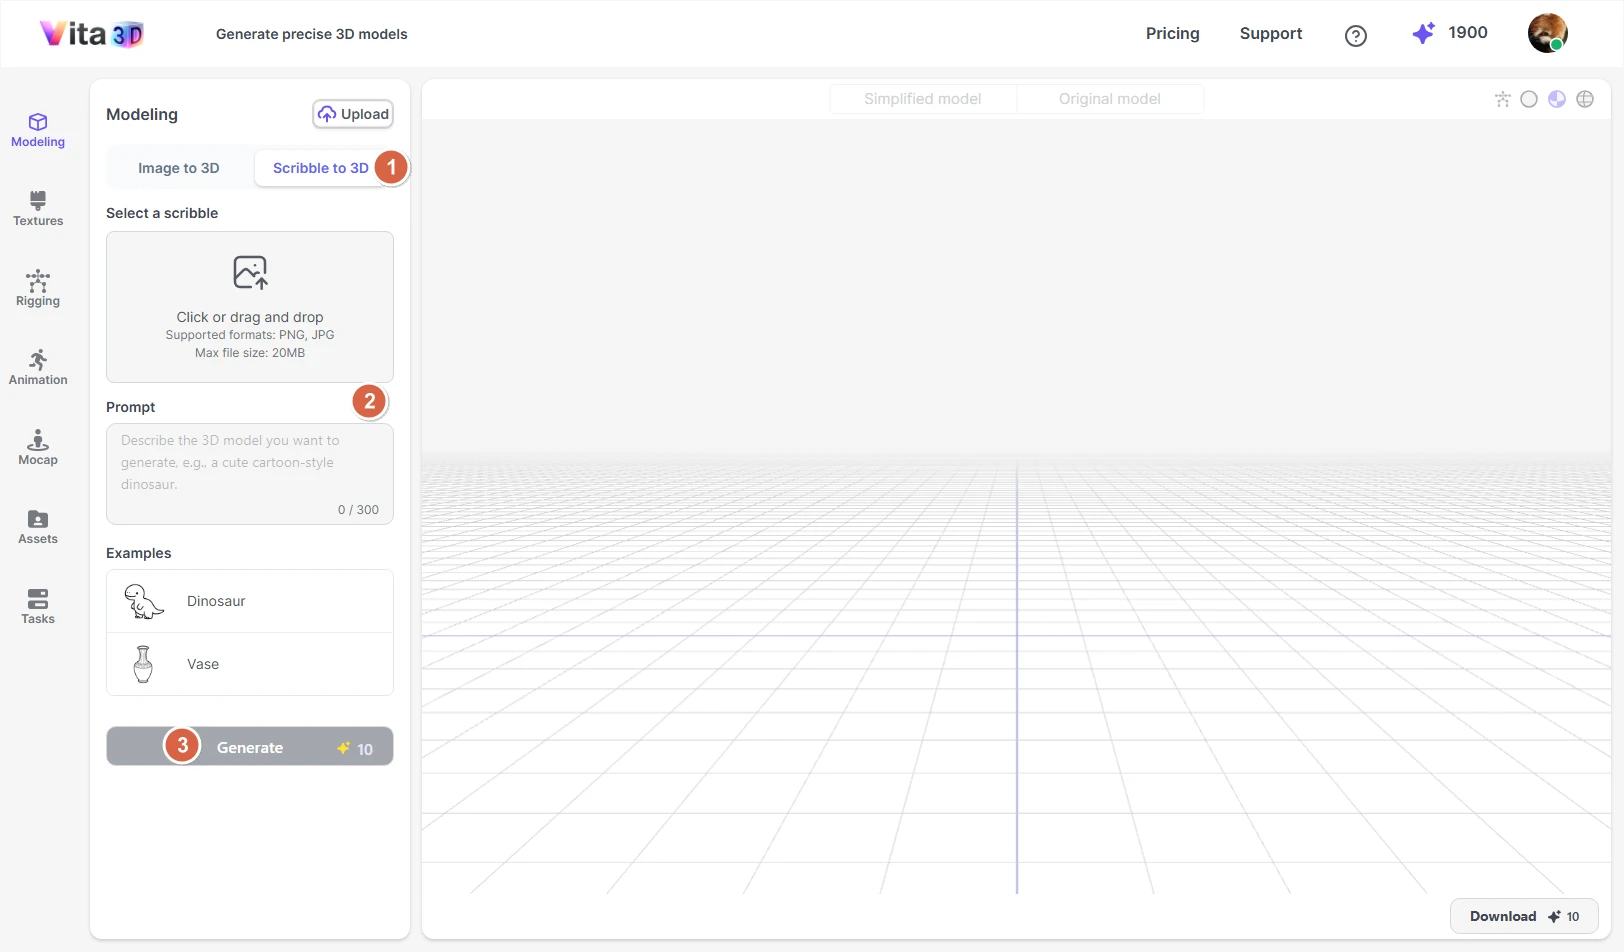
Scribble to 3D
Turn a hand-drawn sketch into a 3D model with the help of a text prompt. Supported formats: PNG or JPG (up to 20 MB).
How to create a 3D model from a sketch and prompt:
1. Go to Vita3D > Model > Scribble to 3D.
2. Upload your sketch and enter a clear description (e.g., “a cartoon fox with big ears, fluffy tail, and blue eyes”).
3. Click Generate.
Upload Models
Already have a 3D model? You can import it directly into Vita3D. We support the following file formats:
- .fbx
- .vrm
- .glb
Once uploaded, you can rig, texture, or animate it just like any AI-generated model.
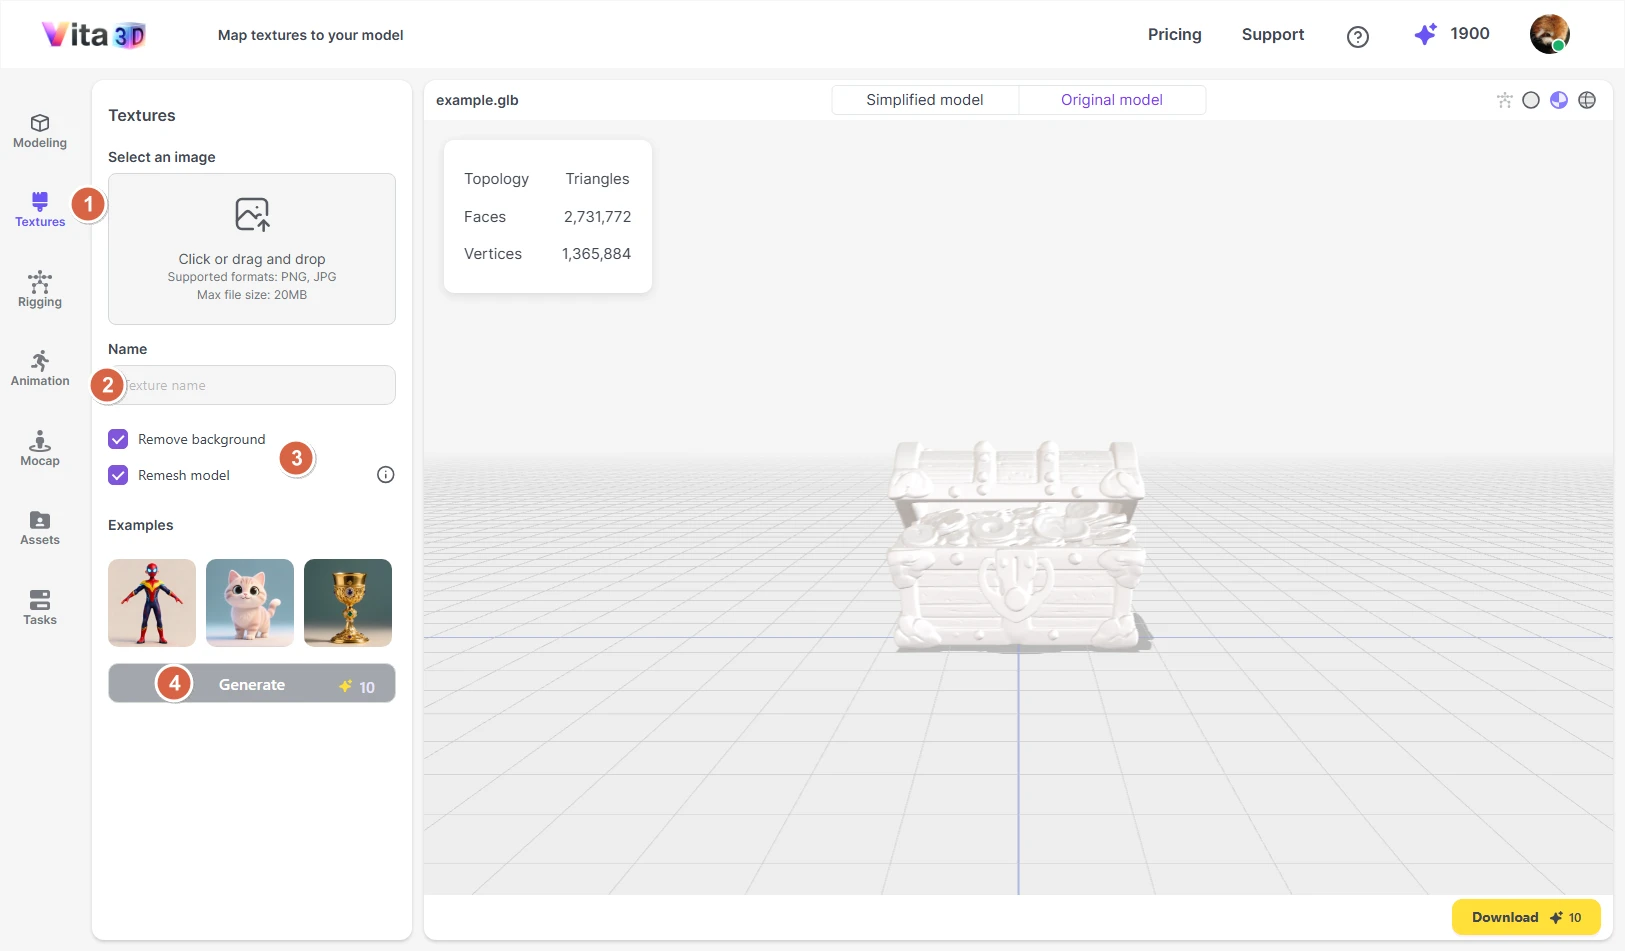
Adding Textures
Vita3D lets you add realistic textures to your 3D models using a reference photo. The system supports PBR (Physically Based Rendering) materials, so your results will have natural lighting, depth, and surface detail, like metal, fabric, or skin.
We support PNG or JPG images (up to 20 MB). For the best results, ensure that the subject, especially facial features if applicable, occupies a significant portion of the image. Close-up shots are preferable over distant or cluttered photos.
When adding textures, there are two optional settings you can enable:
Remove background
Automatically masks out the background to focus the texture on your subject. Recommended for cleaner results.
Remesh model
Temporarily converts your model to a ~40k-face mesh during texturing (then restores the original topology). This speeds up texture generation.
How to add texture:
Make sure you’ve selected the target model in the Model panel before starting, then follow the steps below:
1. Go to Vita3D > Textures.
2. Upload your image and give the task a name.
3. (Optional) Check Remove background and/or Remesh model.
4. Click Add Texture.
Rigging
Rigging adds a skeleton to your 3D model so it can be animated. Vita3D offers two rig types, depending on what you’re creating:
Humanoid
Designed for human-like characters. After rigging, you can preview built-in example animations (like walking or waving) to test how well the bones align with your model.
Articulation
A flexible rig for non-human subjects, such as animals, robots, or props. This type doesn’t support example animations, but it gives you full control for custom animation or export.
💡 Tip: Use Humanoid only for bipedal, human-proportioned characters. For everything else—four-legged creatures, furniture, vehicles—go with Articulation.
How to rig your model:
1. Go to Vita3D > Rigging.
2. Select your rig type (Humanoid or Articulation).
3. Click Auto Rig.
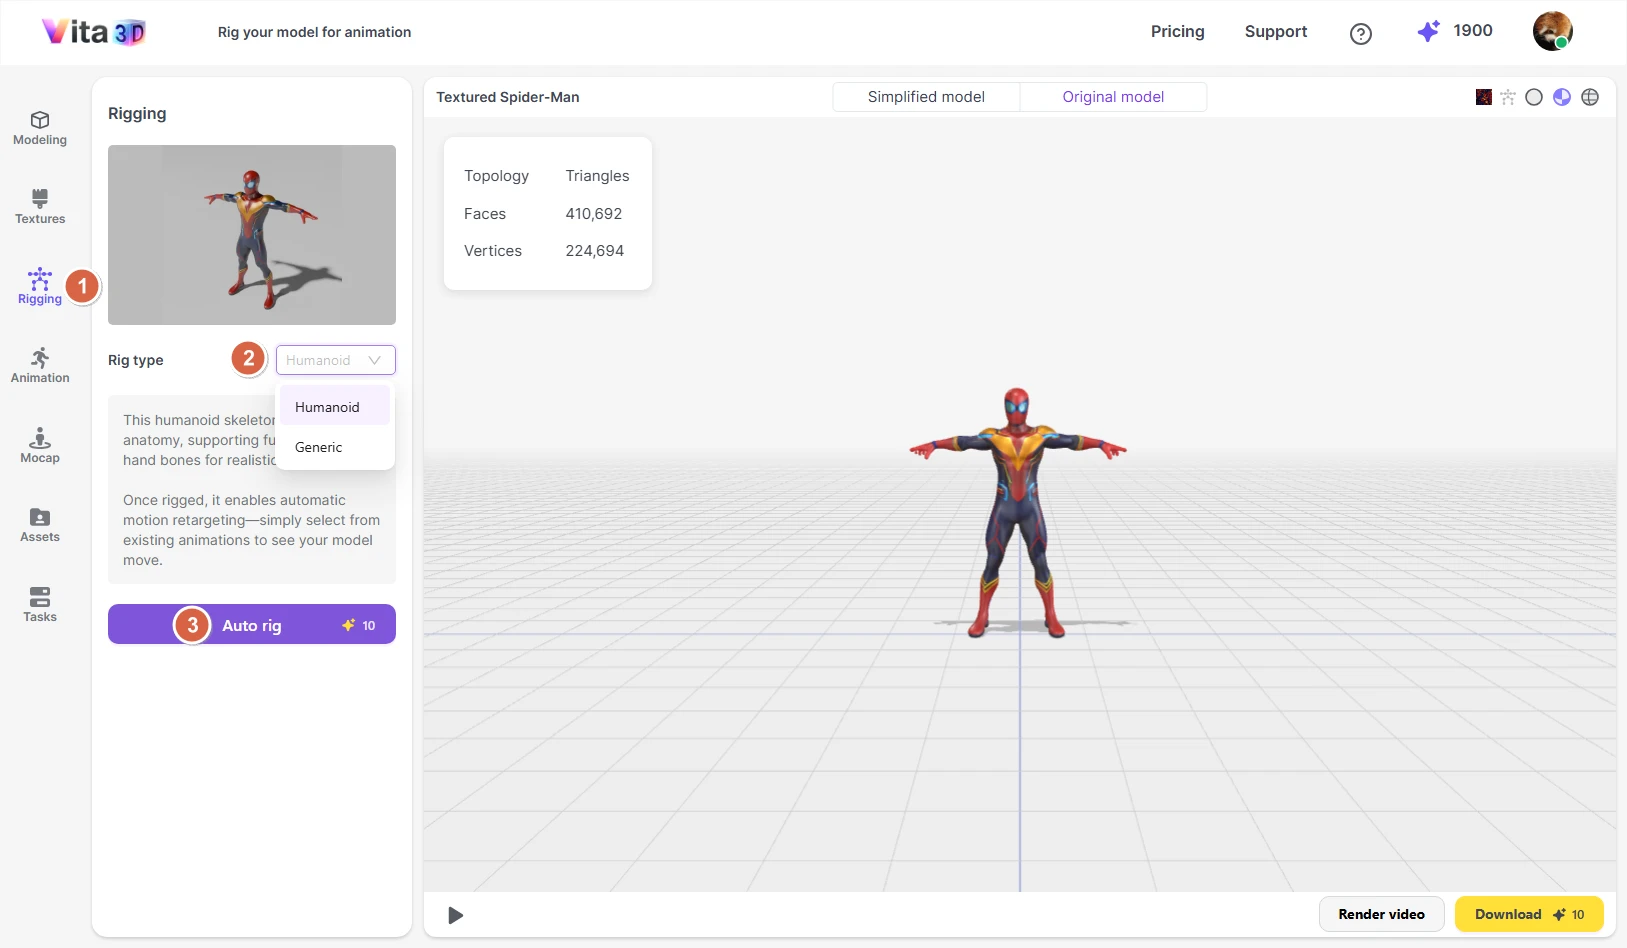
Once rigging is complete, you can (if using Humanoid) choose an example animation (from the Animation panel) to preview the result.
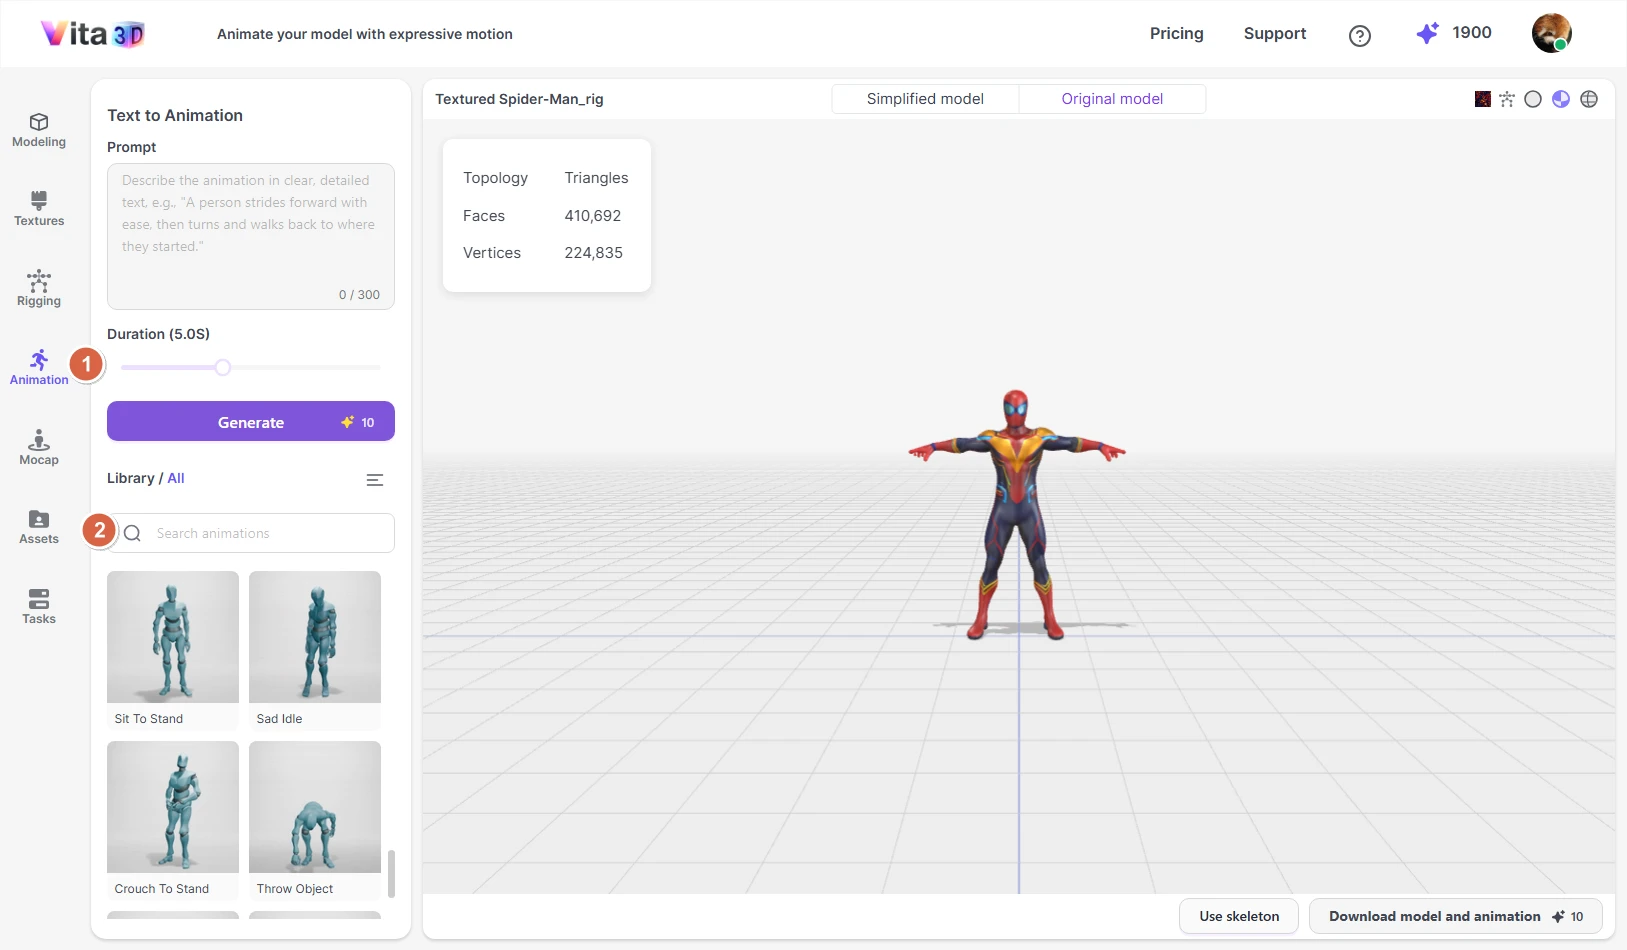
Creating Animations
Vita3D lets you create animations in three ways:
Text-to-Animation: Describe a motion in plain language, and AI generates a matching animation.
Default animations: A library of ready-to-use motions (e.g., idle, walk, jump).
Motion capture clips: Animations created from uploaded video via motion capture.
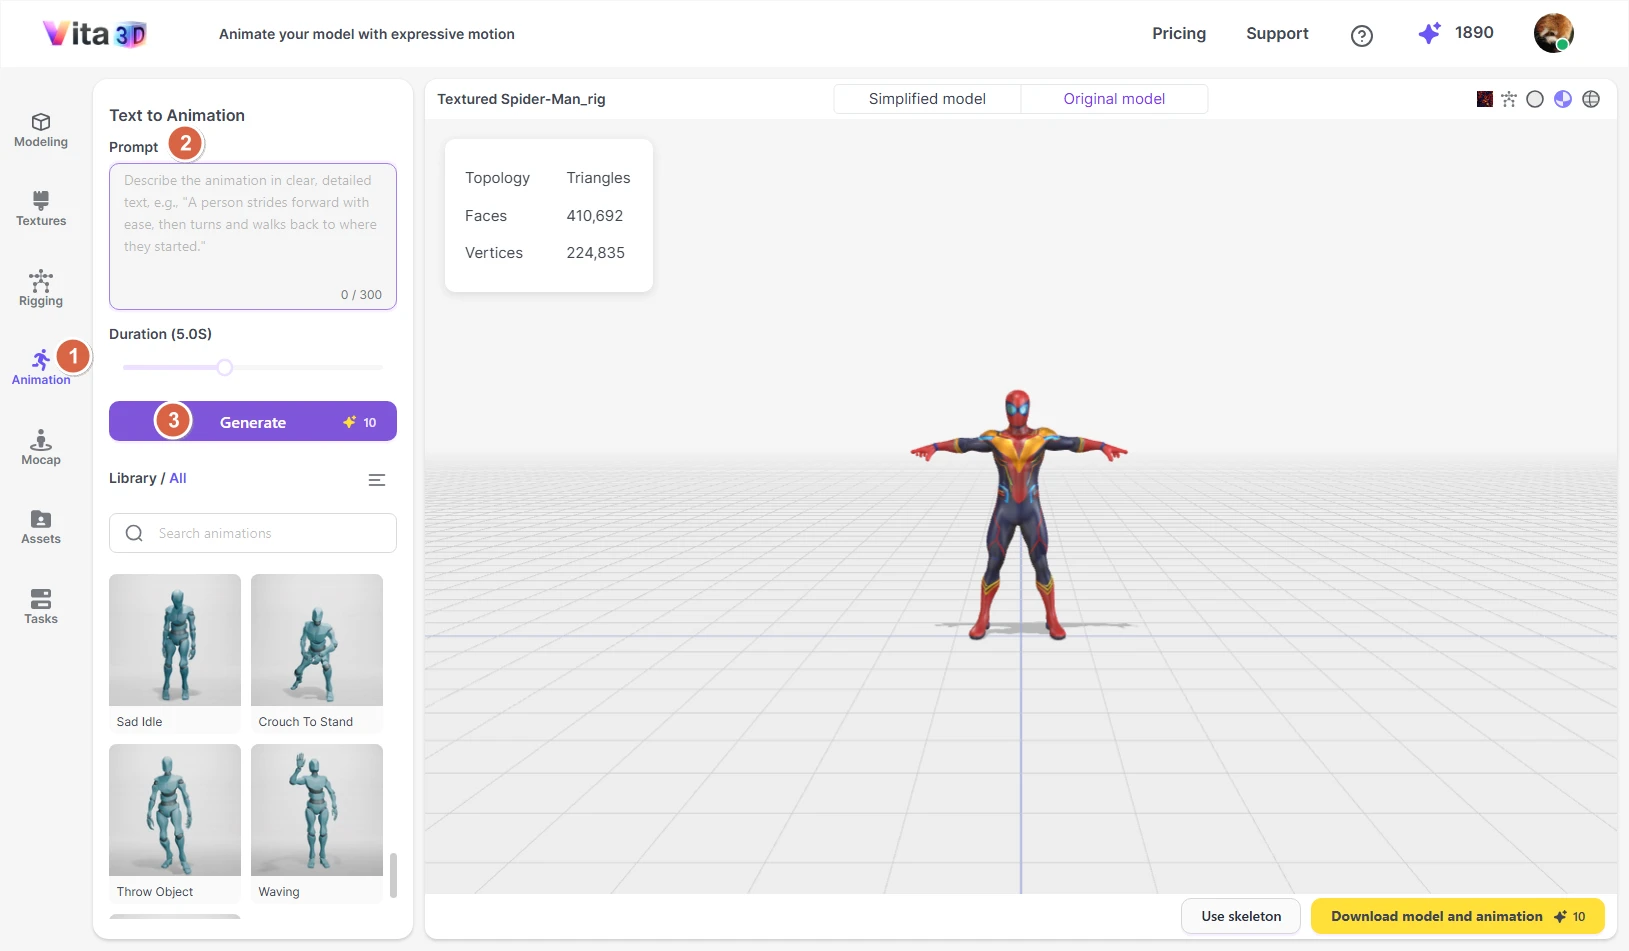
Writing effective prompts
For best results with Text-to-Animation, be as specific and descriptive as possible. Instead of “wave,” try:
“A friendly wave with the right hand, elbow slightly bent, arm moving smoothly from side to front.”
The more detail you provide—about speed, style, body parts, or mood—the better the result.
💡 Tip: Turn on Smart Prompt if you’re unsure how to phrase your motion. It suggests improvements to help the AI understand your intent.
How to animate your model:
⚠️ Make sure you’ve selected a rigged model before starting.
1. Go to Vita3D > Animate.
2. Enter your animation prompt.
3. Click Generate.
Once completed, load the model from the Tasks bar or Assets to view the animation.
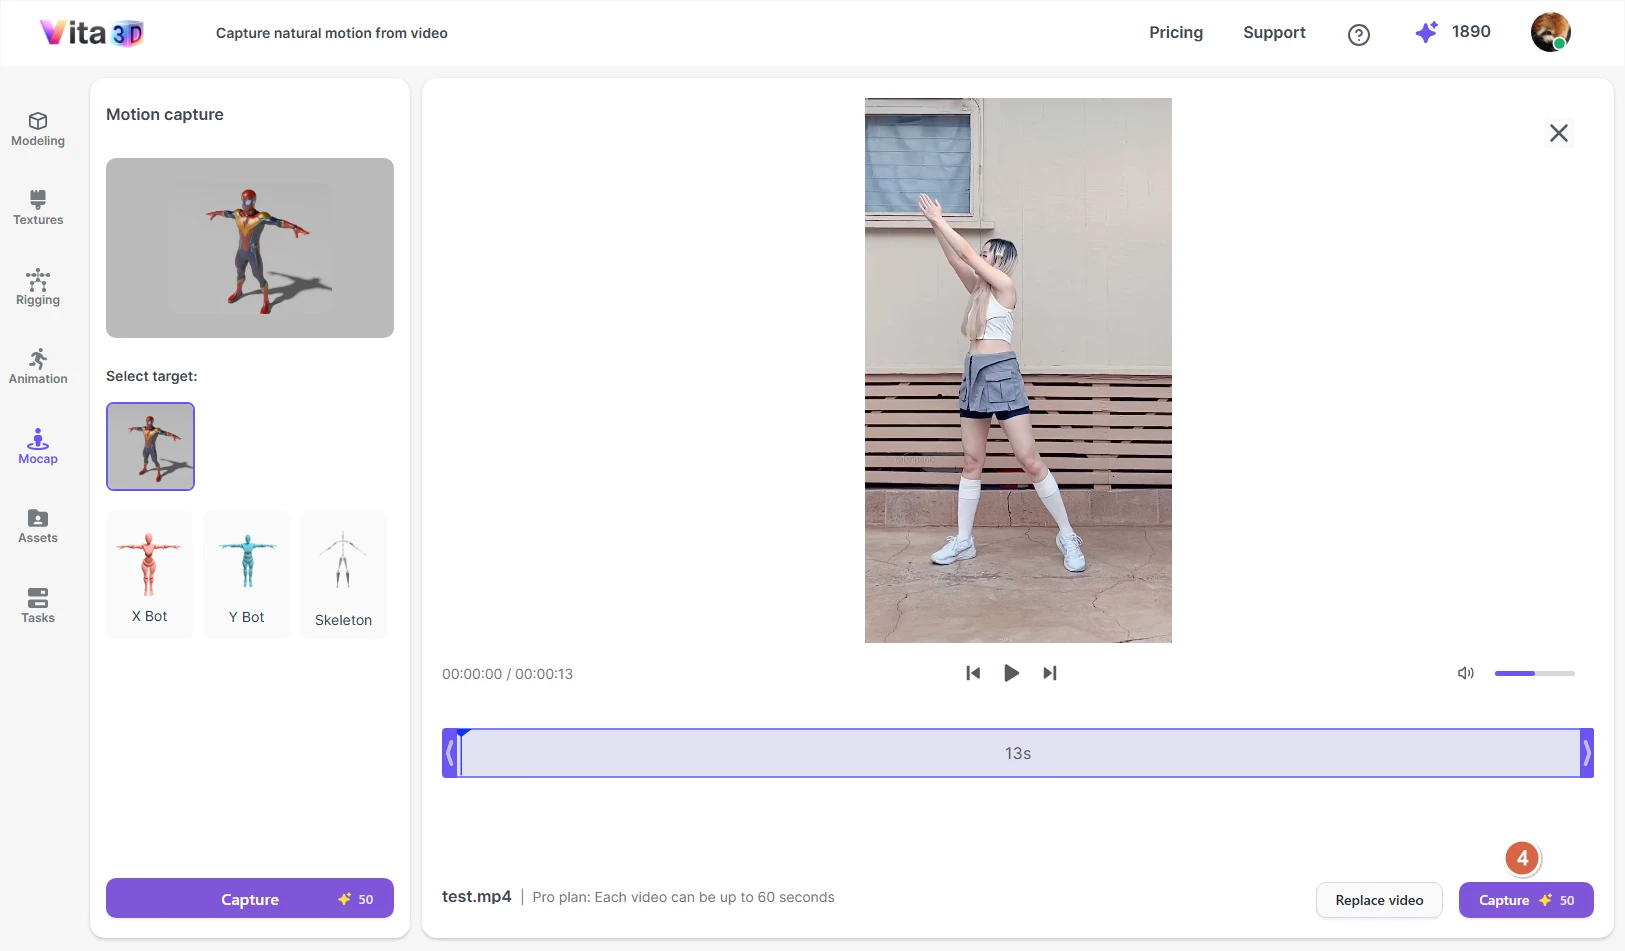
Motion Capture
Vita3D lets you capture motion from video and apply it directly to your own rigged models or to built-in characters like X Bot, Y Bot, or the Skeleton.
For accurate and clean motion capture, please use a video that meets these criteria:
• One person only (no background actors or distractions)
• Clear, well-lit subject with visible joints and limbs
• Front-facing view (avoid side or angled shots)
💡 Tip: Shoot against a plain background and wear fitted clothing to help the system track movement more reliably.
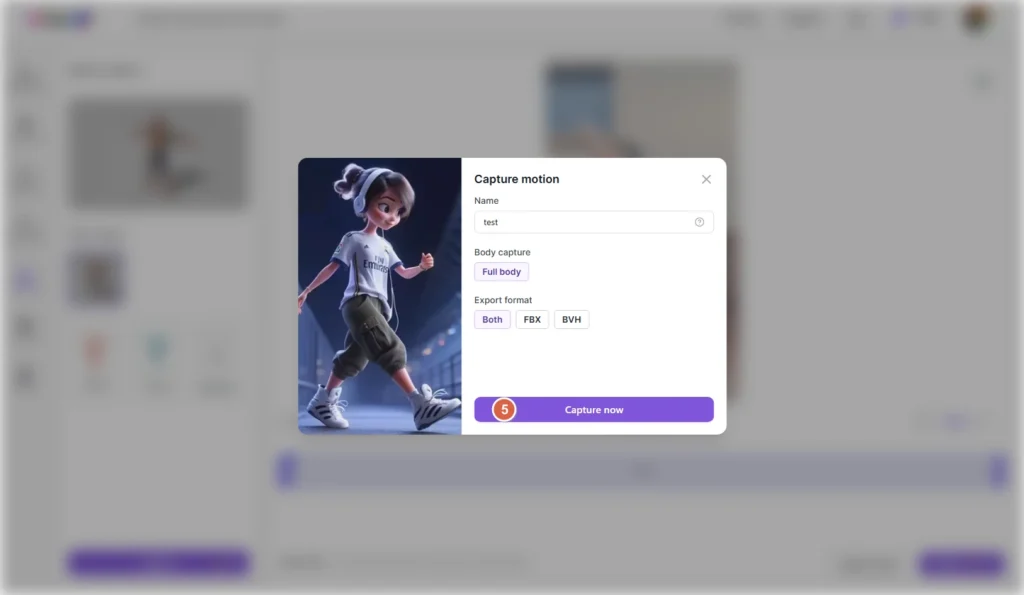
Once processed, your motion capture clip can be exported in industry-standard formats:
- FBX (includes mesh and animation—ideal for game engines)
- BVH (skeleton-only animation—great for retargeting)
- Or both formats at once
How to capture motion from a video:
1. Go to Vita3D > Mocap.
2. Select the target character (your own rigged model or a built-in one like X Bot, Y Bot, or Skeleton).
3. Upload your source video.
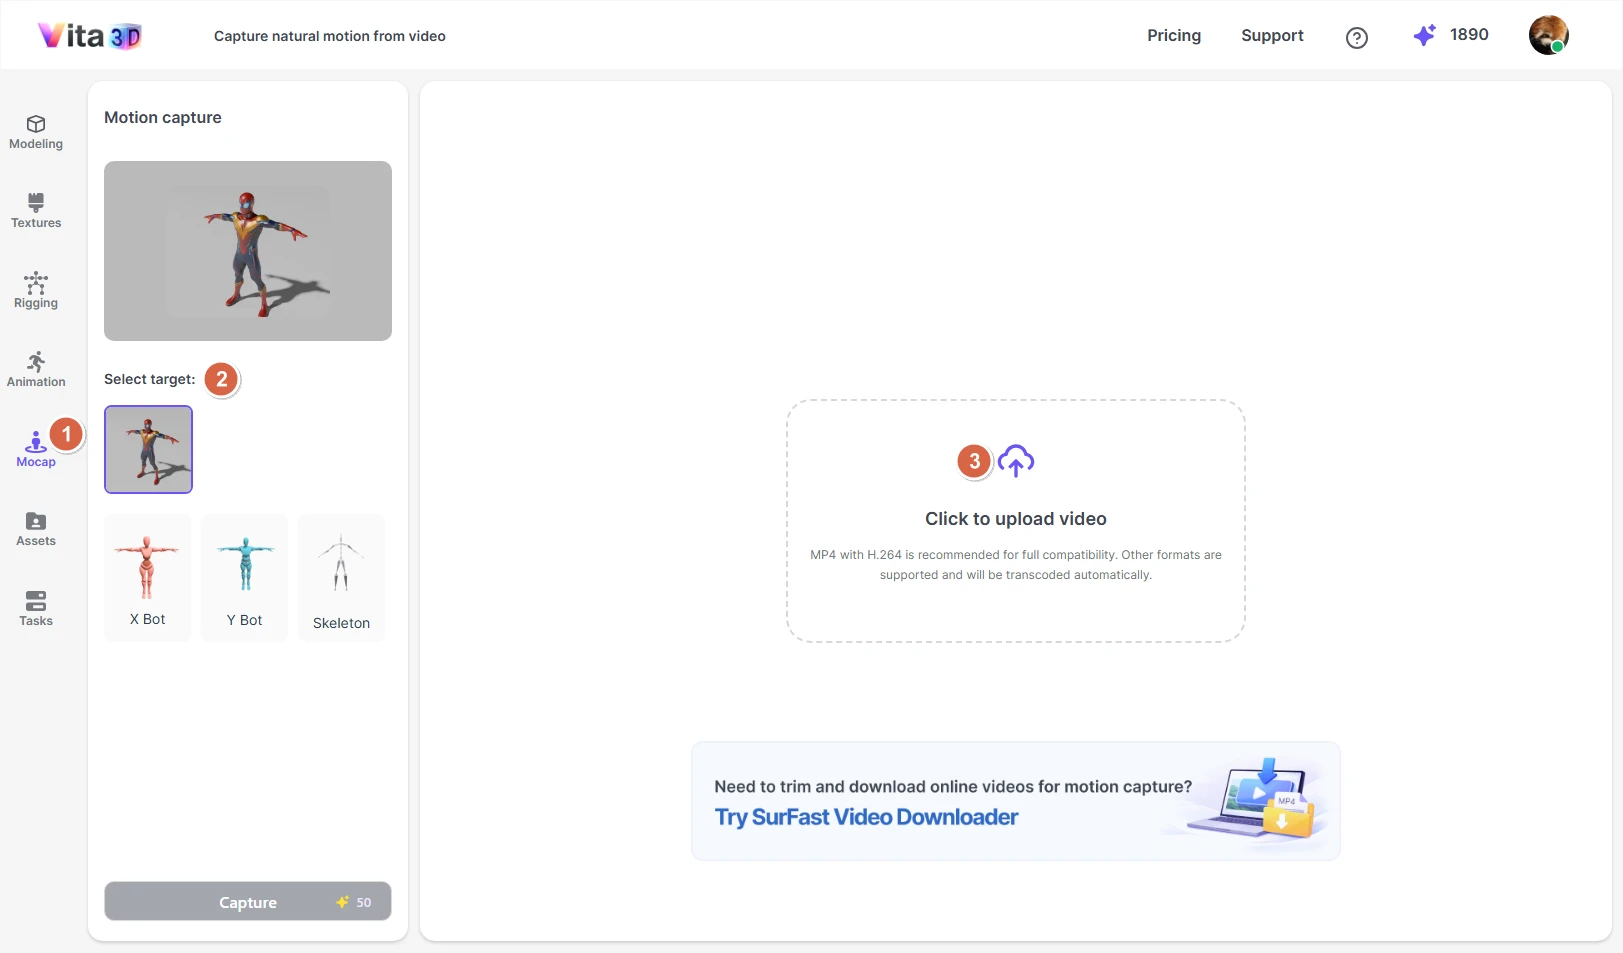
4. Depending on your account type, your video may be subject to a maximum length limit. If needed, trim the clip to the desired segment and click Capture.
5. In the settings window that appears, adjust motion capture options as needed, then click Capture now.
💡 Tip: Keep your clip short and focused on the motion you want—this speeds up processing and often improves accuracy.
Managing Assets
The Assets section is your central hub for all creations in Vita3D, including:
- 3D models
- Textured models
- Rigged characters
- AI-generated animations
- Motion capture clips
Each asset is marked with a small icon in the top-right corner of its preview so you can instantly tell whether it’s a model, animation, or mocap clip.
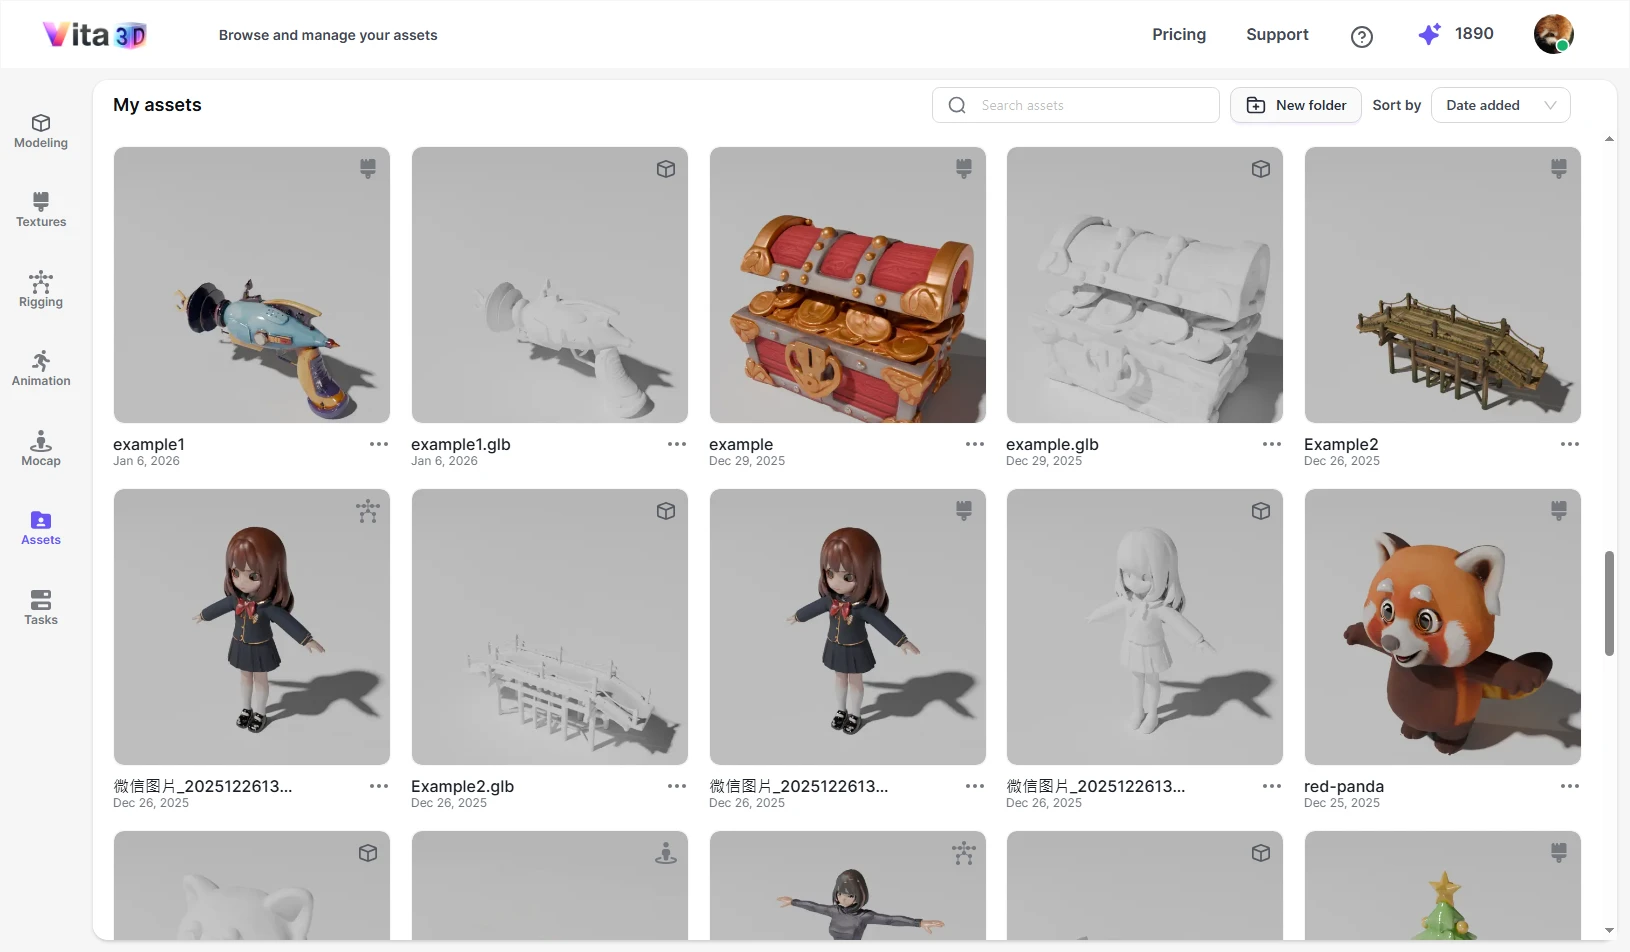
From here, you can:
- Search your library by name
- Copy, rename, or move assets into folders
- Download files (in supported formats like FBX, GLB, BVH, etc.)
- Delete items you no longer need
Everything you create—whether from modeling, texturing, rigging, or animation—automatically appears here, organized and ready to use.
Viewing Tasks
When you click Tasks, a sidebar slides in from the right, showing all your recent jobs from the past three days, including both completed and in-progress tasks.
To load a result into the viewport, simply click the Load button next to any task.
💡 Note: The Tasks panel only shows recent activity. To access all your creations—including older models, animations, and motion clips—go to the Assets section.
AI Audio Tools User Guide
You may encounter microphone issues while using our audio tools. Here is how to fix it.
How to Fix the Microphone Issue
Some PopPop AI services require access to a microphone to function properly. If the service fails to obtain the necessary permissions, please follow the tips below to resolve microphone permission issues.
Google Chrome
To get permission to use your microphone on Chrome:
Step 1. When visiting PopPop.AI, click the View site information icon (it looks like a padlock) to the left of the address bar.
Step 2. Enable the Microphone option to allow microphone usage.
Mozilla Firefox
To get permission to use your microphone on Firefox:
To get permission to use your microphone on Firefox:
Step 1. When you are on PopPop.AI, look for the microphone icon or site information icon (it looks like an “i” in a circle) on the left side of the address bar.
Step 2. Click on the icon, then select Always Block or Blocked Temporarily to clear any existing block and allow the site to request permission again.
Step 3. Refresh the page by clicking the refresh button or pressing F5.
Step 4. When the permission prompt asks for access to your microphone, click Allow to grant the website permission.
Microsoft Edge
To get permission to use your microphone on Microsoft Edge:
Step 1. While using the PopPop.AI service, click the lock icon or site information icon in the address bar.
Step 2. Select Permissions from the dropdown menu.
Step 3. Click the arrow icon next to Microphone and choose Allow.
Safari
To get permission to use your microphone on Safari:
Step 1. When you visit our website via Safari, click Safari and choose Preferences.
Step 2. Click the Websites tab.
Step 3. Select Microphone and then click the arrow icon next to our website to choose Allow.
FAQs
When you use PopPop AI, you may want to know:
How to Cancel a Subscription?
If you paid with PayPal:
- You can log in to your PayPal account and manage the subscription directly from there. For detailed instructions, refer to PayPal’s guide on how to cancel an automatic payment.
- Alternatively, you can contact our support team at support@poppop.ai, and we will cancel the subscription for you.
If you paid with a debit or credit card:
- Please contact our support team at support@poppop.ai to request cancellation of your auto-renewal subscription.
For any further assistance or if you encounter any issues during the cancellation process, feel free to reach out to our support team. We are here to help!